Not for the faint-hearted…!

"Chase me, chase me...!"
Have you ever taken a slow pan shot or used focus stacking? Have you taken macro shots of the insects in your garden or stayed up all night to photograph star trails? If you haven’t, maybe you need to experiment a little bit more!
If you’re a wildlife photographer like me, some of those ideas aren’t really relevant. However, there are still plenty of opportunities to branch out in an effort to find your particular niche—and plenty of professionals have done the same:
Joel Sartore takes studio shots of wild animals against plain black backgrounds
Paul Goldstein takes slow pans
David Yarrow takes wide-angle close-ups using camera traps (or pictures of supermodels with wolves!)
If you’re looking to improve your photography and are willing to try something different, here are a few ideas for you. Some are special kinds of shots that you have to get right in camera, but others are just different styles that you can largely do in post.
In Camera
When I turned professional 10 years ago, I was so keen to learn that I lapped up any articles that I could find on new techniques. I’d read them online and then try them out for myself in real life.
I remember taking single colour pictures of post boxes near my flat in Putney, a zoom burst of a cherry tree at my local tennis club and focus pull shots of fireworks over the Thames.
Nothing persuaded me to abandon wildlife photography, but it was still useful to find out what my camera was capable of.
Even now, with years of experience under my belt, I’m always keen to learn more. I regularly watch YouTube videos by Tin Man Lee, Steve Perry, Matt K and Mark Dumbleton, and it’s always nice to pick up a few tips.
These days, it’s easy to find tuition to help you solve a problem in Lightroom or enable you to get the most out of your camera, but it’s harder to get useful, practical ideas for different approaches to wildlife photography.
For example, there are certain techniques or types of shot that you might not even know about, so how can you possibly search for them, let alone practise them? As I sometimes tell my students, if you don’t know where you’re going, you’re probably not going to get there!
Well, help is at hand. Here are a few tricks that I’ve tried in camera. Just remember, once you’ve taken the shot, it’s too late to fix in post, so you have to make a conscious effort with these ideas.
It’s not an exhaustive list, and there are one or two things even I haven’t really tried, such as night photography, videography, focus stacking, slow shutter speed portraits and deliberately sticking to black and white. However, it should help you add an extra dimension to your wildlife photography.
Slow Pan
Hot to Trot
Paul Goldstein taught me the slow pan on a trip to Svalbard a few years ago. He’s a big fan, and he constantly tells the punters to slow down their shutter speeds, but it’s a dangerous ploy.
A lot of people just want to take pictures that look roughly like the animals in front of them, so they don’t want the risk of screwing up what might be the only chance they get in their entire lives to take home decent shots of a polar bear or a tiger.
However, I love learning and improving in any area of life, so I threw myself into the challenge. On the first day, I took 1,546 slow pan shots—and had to delete all but four of them!
Yes, it’s tough, but the benefit is that you get to show movement in a completely new way. Normally, if you use a fast shutter speed, you freeze the action, so your subject might as well be standing still. However, with a slow pan, the blurred legs or wings and the blurred streaks of the background give a clear signal that the animal or bird is in motion.
If you want to find out more about how to take slow pan shots, I suggest you read my post on the subject.
Sunny Silhouettes

"Who turned out the lights?"
A few years ago, I was taking pictures of giraffes in a safari park called Cabárceno in northern Spain, but I wasn’t happy. I felt like I was just taking ‘record shots’ that didn’t show any originality or drama.
Without really thinking about it, I decided to take a backlit shot against the sun and underexpose it by two whole stops. After a bit of work in Lightroom, I realised I could create what I call a ‘sunny silhouette’—in other words, a black background with just the golden outline of the subject showing.
In hindsight, I’m sure photographers had done this before, but I’d never seen it myself, so I was happy to have come up with something original.
Backlit shots are good way of making your wildlife photography stand out. The best place in Africa to go for silhouettes is a private conservancy because, unlike a national park, there are no opening and closing times.
If you can find wildlife on a treeless plain that gently slopes up towards the west (at sunrise) or the east (at sunset), you should be able to get some great silhouette shots lying down on the ground—as long as it’s safe enough to leave your vehicle!
Again, it’s not as easy as simply taking pictures with the sun directly behind you, but who said life was easy…?!
The reward for taking on something this challenging is a portfolio that makes people go 'Wow!’ rather than just ‘Meh…’. And that’s what you want, right?
If you’d like more help with taking backlit shots, feel free to read my post on this blog.
Bad Weather

White Run
When the weather is bad, most people try to stay indoors—even photographers! But that’s a mistake. The whole point is that bad weather is unusual, which means you get opportunities that you never get when the sun’s shining.
There are many different kinds of bad weather, including cloud, rain, snow, wind and lightning. Every one offers a chance to take original shots that you might not find elsewhere.
Because bad weather is so rare, you generally have to go and find it! You’re unlikely to be able to photograph animals in a blizzard if you stay in London or Paris, so you need to go somewhere that offers you a good chance to see the wildlife you want in the conditions you want.
Sure, it won’t be comfortable, but as long as you protect yourself and your equipment with the right gear, you should get the benefit of dramatic conditions that add a unique element to your photos.
For example, I took this picture of a penguin in a snowstorm on Danco Island off the Antarctic Peninsula. There was a gale force wind behind me that meant I couldn’t even turn round for fear of being blinded by the snow, but I got the shot…!
In Post
The first thing to say here is that it’s always best to try to get things right in camera rather than waiting to ‘fix it in post’! You can only play around with the settings to a certain extent in Lightroom or Photoshop before you start to affect the sharpness, contrast, noise and colour rendition of your images.
Most of my favourite shots have been the result of a combination of a good sighting and a bit of work in Lightroom, but the following techniques are largely achievable through post-processing.
The point is that you can create lots of different ‘looks’ or ‘styles’ out of the very same image. Here are a couple of examples:
Mark Dumbleton has a preference for desaturated backgrounds, blue-ish shadows and warmer highlights, so he plays around with the HSL/Color and Color Grading in Lightroom.
Matt K (for Kloskowski) likes to use masking to brighten the subject and darken the background to make his birds and animals stand out.
I’ve adopted elements of both these approaches to create a custom preset that I apply to all my images. It reduces the amount of time and effort it takes to prepare them for sale through stock agencies, and it provides a good starting point for any further editing I think is necessary.
Anyway, here are the options for a few different styles of post-processing.
Low Key
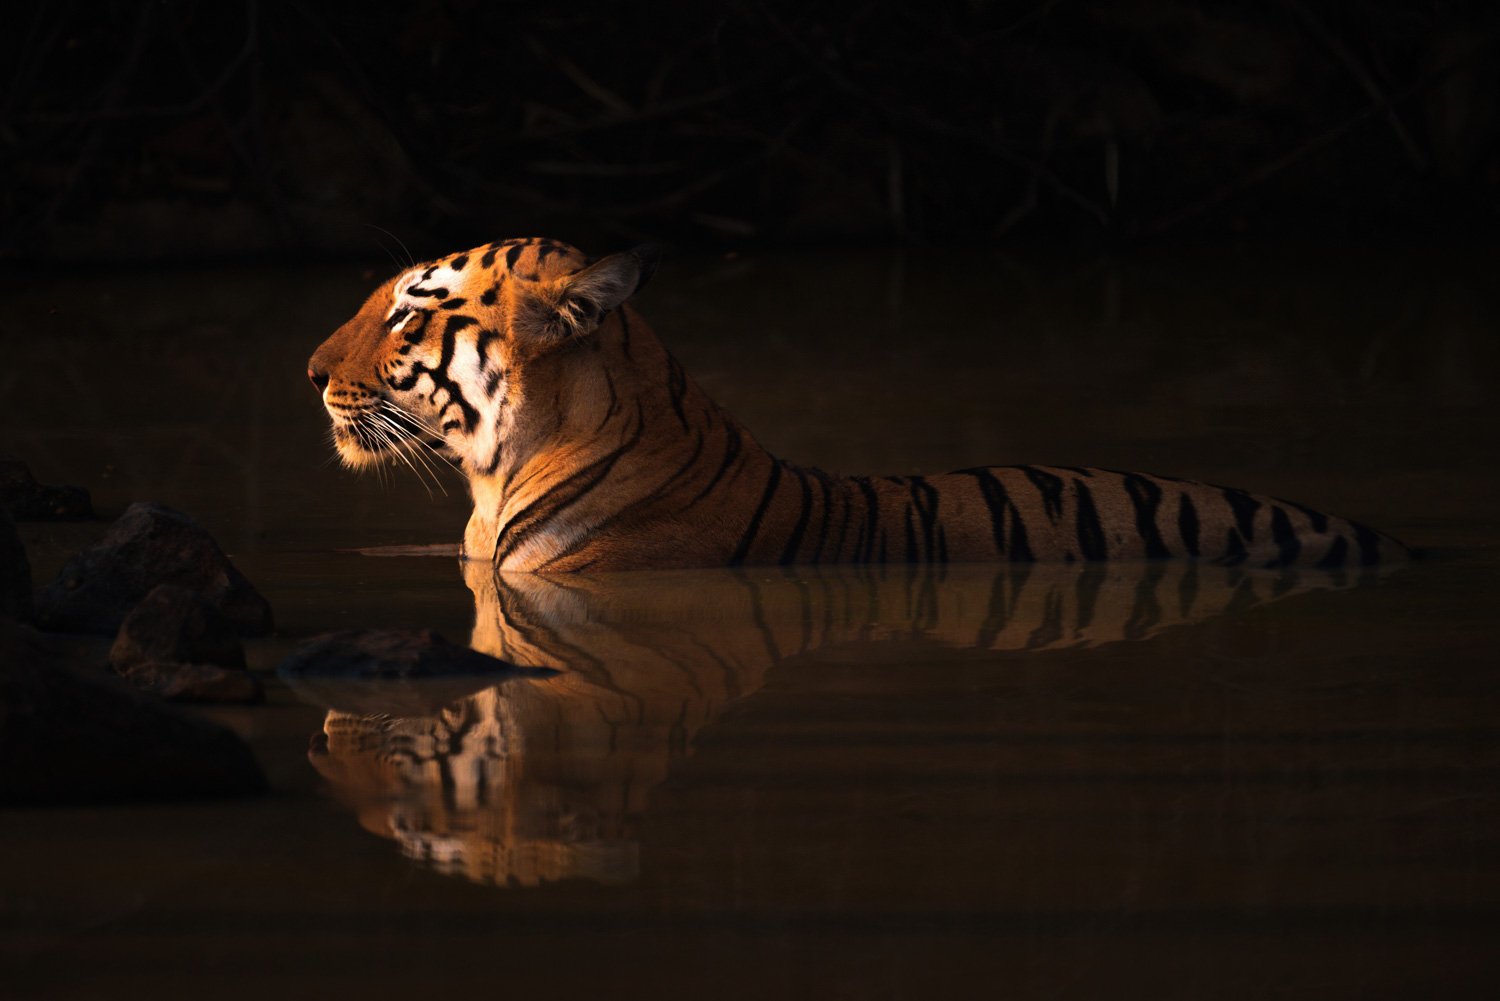
"Tiger, tiger, burning bright…"
For some reason, many people seem to like low-key wildlife images—especially those with black backgrounds. This offers you a great opportunity to add drama and atmosphere to your images.
Ideally, of course, you should underexpose in camera, but you can still darken your photos in post even if you forget. Modern Raw files allow you to play around with the exposure more than ever before without compromising on image quality.
I like to use -1 EV of exposure compensation when photographing during the Golden Hour at sunset or sunrise, but underexposing works at any time of day.
I took this shot of a tiger at around midday under a clear blue sky on a scorching hot day—it was 47°C in the shade! The scene was pretty ordinary, to be honest, but I remembered something that Paul Goldstein had said to one of the guests beforehand.
He’d warned him to underexpose slightly to make sure the highlights on the chest of the tiger weren’t blown out, but I thought, ‘Go big or go home!’
I took a series of shots, underexposing by one or two stops, and then got to work in Lightroom. In the case of this shot (above), I’d already underexposed by 1 EV, but I pushed the Exposure slider down to -1.45, added a radial mask to create a vignette and then added another one at a 30° angle to illuminate the face of the tiger—as if she were lit by a ray of light in a cave…!
I was happy with the result, and Paul even ended up choosing it to put in the Exodus calendar that year, so it was worth it in the end.
High Key
Bird's Eye View
High-key wildlife images are probably not as popular as low-key ones, but they offer a useful opportunity to add a unique twist to shots taken amongst snow and ice or make the most of overcast conditions.
It’s easy to create a high-key image when the subject and background are mostly white, so the Arctic and Antarctic are the obvious places to try it out. Polar bears, Arctic foxes and Arctic hares are all white (or white-ish) at the right time of year, and the polar regions still have a healthy supply of snow and ice.
High-key images don’t necessarily need to be over-exposed, but it’s useful to dial in a stop or two of positive exposure compensation to make sure your whites are white and not grey!
The same goes for shots taken against an overcast sky. Clouds aren’t always the photographer’s friend (!), but they offer a great chance to isolate your subject by turning the background white.
This shot of a heron (above) is a good example. The weather wasn’t ideal. It was 10 tenths cloud, so I’d missed out on the Golden Hour, and we didn’t have many good sightings. However, I spotted this black-headed heron perched on a dead tree stump, and I overexposed by a stop.
When I got back, I pushed the Highlights, Shadows and Whites sliders up to +100 and brought down the Blacks to -30. And that’s it! The clouds in the distance disappeared, and I was left with a nice, minimalist image.
It’s amazing how easy it is to get rid of the background—even if it’s not white. I once took a shot of a couple of lynx at a safari park in Cabárceno. By overexposing in camera by a stop and then adding a further 2.7 stops of exposure in Lightroom, I was able to get rid of the sunlit grassy background completely!
Masking
A Watchful Eye
The new masking tools in Lightroom are a revelation. They make it incredibly easy to edit your subject and background separately, and that gives you a great chance to increase the separation between the two.
As I mentioned before, I got this tip originally from Matt K, who did a useful video tutorial about how to edit birds in flight.
He covered his whole workflow, but the important point here is that he created a subject mask so that he could brighten the eagle and then a background mask so that he could darken everything else.
To take an example from my own collection, have a look at this shot of an Indian roller (above). I underexposed it by three stops in camera, but I got a few comments from people complaining that the bird was so dark they couldn’t see it properly!
I added a subject mask and boosted the Temp to 38 and the Highlights to 100 to make the bird stand out. I also added a background mask to bring down the bright spots in the branch on the left of the frame. This is the final version.
Lightroom masking is so quick and easy these days that it’s a powerful tool to help you batch edit your images. All you need to do is create a custom preset that includes all the changes you want to make by default.
The human eye is drawn to bright, contrasty, warm, colourful, sharp elements in our field of view. To isolate your subject, you simply have to add a subject mask to boost those attributes and a background mask to reduce them.
Obviously, the changes you make should be subtle, but you can make whatever changes you like to whatever sliders you like, and applying these masks is a great way to develop a consistent ‘look’ to your photos with very little effort.
Verdict
The quality of a photograph depends on a combination of the original composition or camera settings and the effects of post-processing. It’s a symbiosis, so the two depend on each other.
If you’re looking for more originality in your work, this list should help you achieve it, but the best advice is probably just to think about the shots you’re taking in advance.
If you visualise what you want and choose the appropriate settings in camera, that should give you the best opportunity to get what you want. However, as I’ve found in my own experience, you often need to do quite a bit of work in post to turn a good image into a great one!
If you’d like to order a framed print of one of my wildlife photographs, please visit the Prints page.
If you’d like to book a lesson or order an online photography course, please visit my Lessons and Courses pages.