
“Watch out! Watch out! There’s a distraction about!”
Backlit Beauty
By definition, the background isn’t supposed to be as important as the subject, right? Well, that may be true, but the real point should be that you usually have far more control over the background than the wildlife!
Here’s a pick-and-mix list of things you can do to improve your backgrounds—either by removing something negative or adding something positive.
Negative Backgrounds
Most discussion of backgrounds involves removing something negative, so let’s start there.
Remove Distractions
Jumping for Joy
A distraction is anything that tends to draw the eye away from your subject. It could be literally anything, from an annoying tree stump to a lampost ‘growing’ out of an animal’s head!
Water and the sky make excellent backgrounds as they are usually fairly smooth and uniform, and I love shooting animals on the horizon—especially at sunrise or sunset. Even if you’re in a different situation, you can usually just reframe your composition or move somewhere else so that any distractions are no longer in the picture.
However, that’s sometimes easier said than done. If you’re on foot, you’re obviously free to stand up, sit down, lie down or walk around, but wildlife photographers have to cope with certain constraints:
Wildlife can be dangerous.
Wildlife can be inaccessible.
Wildlife can be skittish.
Wildlife can be stressed.
Wildlife can be in zoos!
If you’re in any sort of vehicle, whether it’s a safari truck, boat, train, aeroplane, helicopter or balloon, you still have similar constraints, and even your mobility is limited:
Jeeps can’t usually go off-road in African National Parks.
Boats can’t go in water that’s too shallow or rocky.
Trains and aircraft don’t stop for you to take a picture.
Balloons can’t be ‘driven’ in any direction and at any altitude.
Etc, etc…
Any one of those factors can limit your room for manoeuvre, so you just have to do the best you can. However, it’s still important to get as much as possible right in-camera, checking the background before you take the shot or even ‘staging’ the scene. If there’s a distracting background, you can always correct your position, settings and focal length beforehand rather than storing up a nasty problem that you might not be able to solve in Lightroom or Photoshop.
Even if you can clone out a distraction in post, you won’t necessarily want to. I take a fairly liberal view of these things, but some wildlife photographers are religious about never adding or subtracting from their compositions. In addition, most reputable photo contests have rules about exactly how much you can mess around with your images.
Something to bear in mind…
Blur the Background
There are several different ways to blur the background to remove distractions:
Use a wider aperture.
Use a longer focal length.
Move closer to your subject.
Move back the background.
Widen Your Aperture
Winged Wonder (taken with my 600mm lens at f/4 from around 20 yards away)
One of the reasons wildlife photographers (such as me!) spend thousands on prime super-telephoto lenses is that they’re generally ‘faster’—in other words, they have wider maximum apertures.
That means it’s possible to reduce the depth of field by shooting at f/4 or even f/2.8 rather than f/8 or f/5.6. At long range, there isn’t much of a difference, but that changes as you get closer to your subject.
You can find out everything you need to know by downloading an app to your phone, such as SetMyCamera. Once you’ve entered your camera make and model and the focal length of your lens, you can see exactly what the depth of field will be at different distances from your subject.
For example, if I used my 600mm lens with my Sony ⍺1 at its widest aperture of f/4, the depth of field at 100 yards would be 6 yards. That’s plenty of room for a bush, branch or tree trunk to be sharp enough to be a distraction.
However, if I moved so that I was only 10 yards from my subject, the depth of field would shrink to 0.06 yards (or just 2.16”). That’s a big difference!
The other advantage of a wider aperture is that it’s much easier to shoot in low light. Tin Man Lee tells a story of an encounter in Africa when he got very excited and kept shooting a big cat way after sunset. When he finally stopped to talk to the other guests, he found that everyone else had given up because it was too dark for their lenses!
All my lenses (apart from the 600mm) have a maximum aperture of f/2.8, so that’s usually fast enough for early mornings and late evenings—but not always.
Use a Longer Focal Length

Fly Bee (taken with my 800mm lens at f/5.6 from around 30 yards away)
All other things being equal, a longer focal length will give you a much shallower depth of field. For instance, if your subject is 20 yards away, a 600mm lens at f/4 will give you a depth of field of 0.24 yards (or 8.64”), but a 50mm ‘standard’ lens will give you nearly 150 yards!
It’s true that the depth of field of the 50mm lens would be exactly the same if you kept the framing the same by moving much closer, but even then, the 600mm would give you a more blurred background. Why is that?
Well, by using a 600mm, you’re magnifying not just your subject but the background, too. That means any bokeh balls will be bigger and any sharp areas less distinct. To understand this a bit better, think of it as zooming in on an image. It might appear fairly sharp at 100%, but as you zoomed in to 100%, 200%, 400% and so on, it would get much blurrier.
In a strange way, this is a good reason to keep your distance from wildlife. Being further away means you can use a longer lens for the same framing, which means you can blur the background even more, further separating it from the subject.
Move Closer
Little Brown Job (taken at 500mm at f/9 from around 5 yards away)
If you don’t change your aperture or focal length, moving closer to your subject also reduces the depth of field. This is a good reason to get as close as possible to wildlife. Even if you’re too close to get the entire animal or bird in the frame, the background will be much more blurred, leading to greater separation.
Move the Background Back
Wings of Gold (taken from a boat on the lake with my camera on the gunwale to lift the pelican above the waterline)
Finally, you can move the background back by changing position—either horizontally or vertically. This doesn’t change the depth of field, but it does mean any potentially distracting elements in the background will be further away and therefore more blurred.
The simplest way to move vertically is to get lower to the ground by kneeling or even lying down. This is the most common tip I give to my photography students, and one of the benefits is that it brings your shooting angle closer to the horizontal. That means the patch of ground or water just behind your subject is no longer in the shot, being replaced (ideally) by something in the far distance that will be outside the depth of field.
It doesn’t always work, obviously, as it depends on the type of undergrowth and the amount of long grass, bushes and trees in the area, but it’s a good start.
Moving horizontally just means walking or driving to the left or right so that a particular distraction is no longer in shot. This might be a tree, a rock or another animal. Either way, by removing it from the composition, you’re making room for something more distant that will be more blurred and therefore less distracting.
Positive Backgrounds
Even if you know enough about it to remove distractions, it’s easy to ignore the value of a ‘positive background’—in other words, one that actually adds to the impact of your image rather than subtracting from it.
As Mark Carwardine once said, “There are only three elements to a photograph: the subject, the light and the background.” It’s important to use all of those to improve your shots—and the background is often the easiest to fix.
Add a Golden Glow

Blue Bird
One way to liven up your backgrounds is to illuminate them with a golden glow. This works best if your subject is well-lit or in silhouette. If not, you might end up with the opposite of what you normally want, with the subject in the shade and the background in the sunlight!
The golden hour gets shorter and longer depending on your latitude, but it’s always a good slot to look for warm backgrounds. It helps if the colour palette is right, too, so dry grass is a better choice than a green, leafy bush!
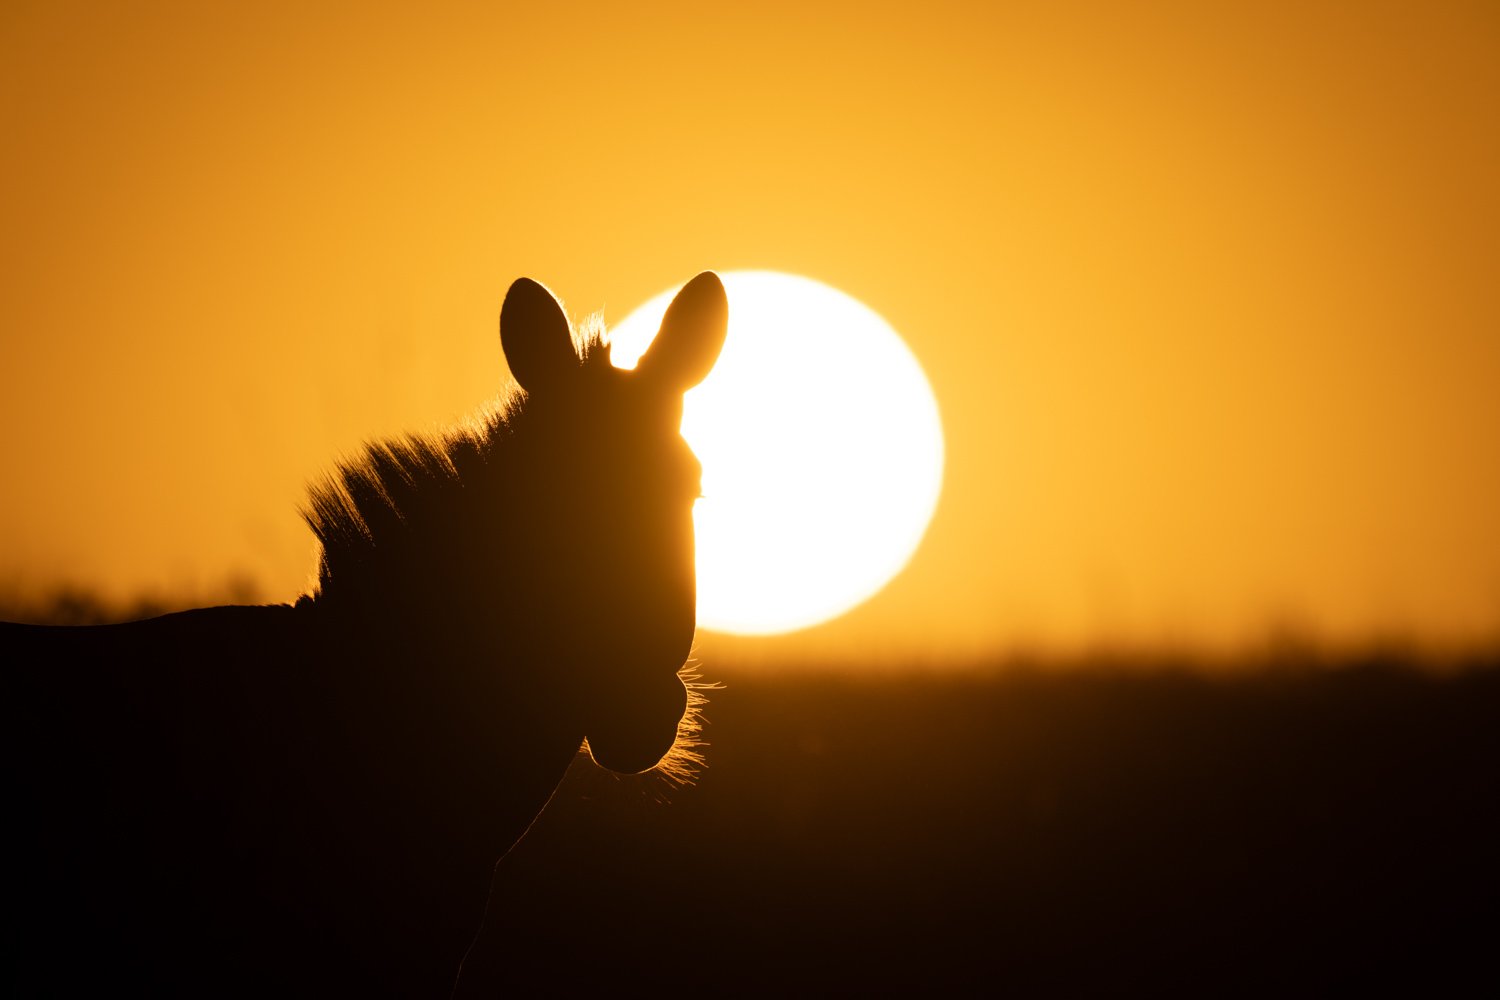
Shoot Sunrise or Sunset Silhouettes

Miss Saigon (taken at f/16 sunset)
An easy way to create a stunning background is to shoot silhouettes at sunrise or sunset. The sky can often be so beautiful that it almost becomes the subject of the photograph—especially in environmental portraits, where the subject is a relatively small part of the frame.
I find that dawn is a particularly good time to find a golden sky, and I try to shoot wildlife silhouettes whenever I’m on an early morning game drive in Africa.
However, it’s hard to beat the classic shot of an animal on the horizon at sunset—especially if you manage to get the sun itself in the shot, together with a few attractive clouds. You can also play around with exposure compensation to darken the image and enrich the colours, making the sky a little bit redder.
One of the trickiest parts of shooting silhouettes at sunrise or sunset is having to find a suitable location. Ideally, you need a treeless plain that slopes up towards the east (at dawn) or the west (at dusk) so that you can get a nice, clean horizon.
You also need to get as low as possible to the ground so that your subject’s legs are clearly visible above the horizon. If you’re in a safari truck, that can be tricky, but it might be safe to lie down beside it if there are no predators in the area.
Finally, you need the right camera settings. Unless I’m trying for a slow pan, I usually shoot in manual mode with auto ISO, but I’ve recently started opting for aperture priority. That’s because I want to maximise my image quality and make sure that the sun and/or clouds are as sharp as my subject.
If I set my ISO to the lowest native value (100 on my Sony ⍺1) and dial in a narrow aperture of around f/16, I can get all that and leave the camera to choose a suitable shutter speed.
Create Black Backgrounds
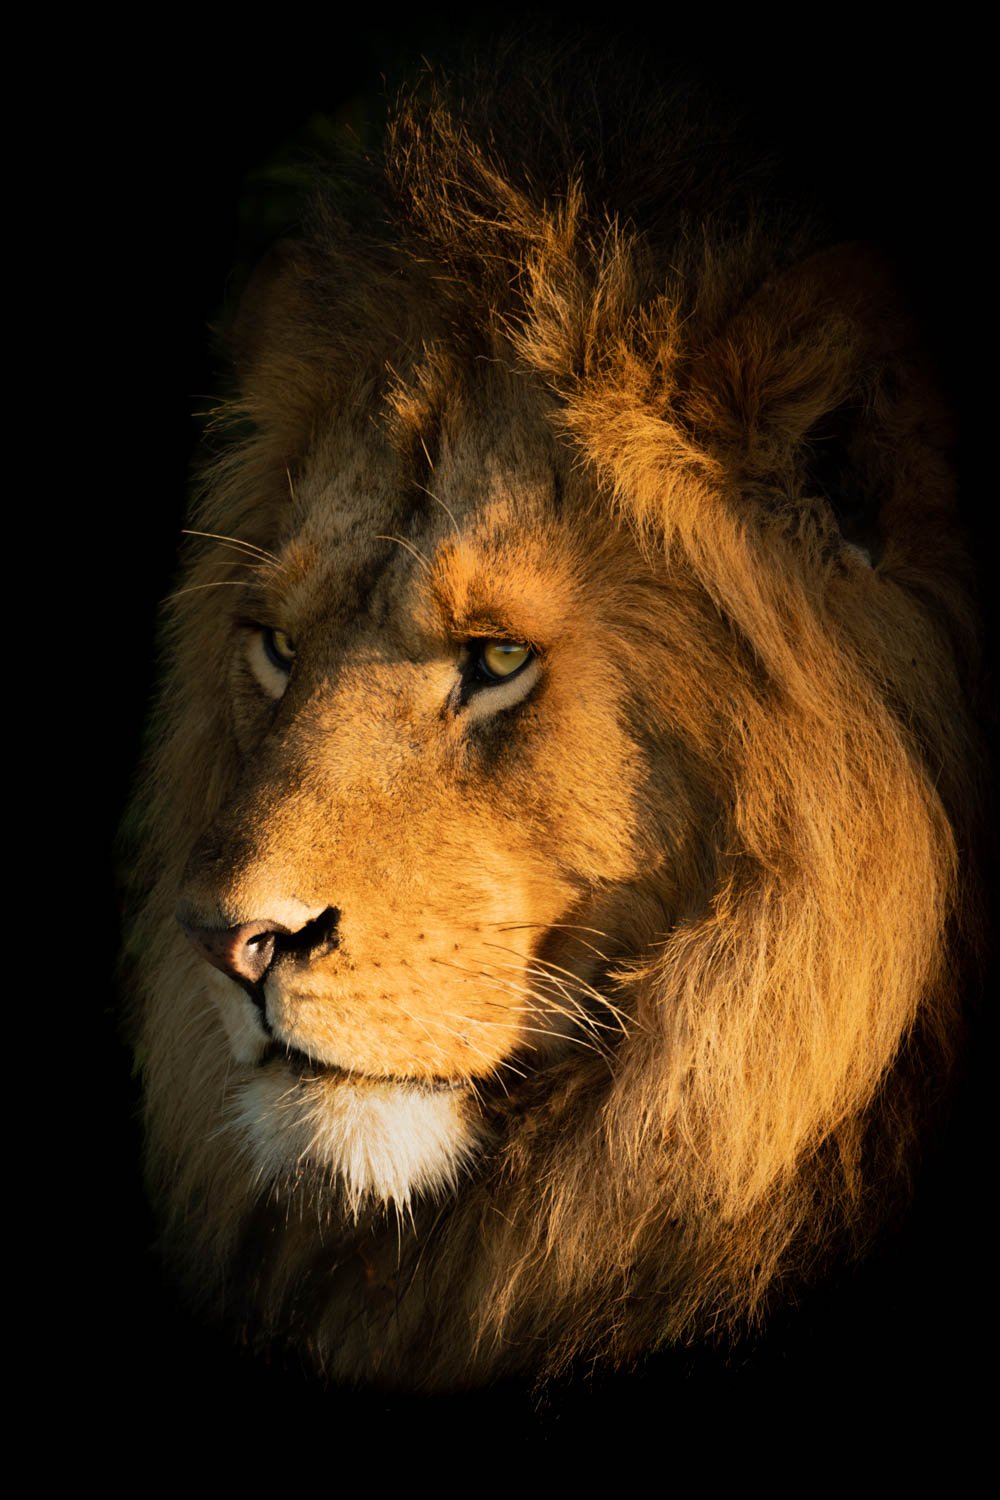
He-Lion
After one of my exhibitions a few years ago, I asked the curator which of my images people had liked the most, and she told me it was the ones with the black backgrounds. That makes sense to me as I love such a dramatic contrast between subject and background.
It’s better to produce the effect in camera, but it’s not always easy. Ideally, you need a subject in the sunshine with a shadowy area in the background, but that’s not always possible.
You can, of course, use Lightroom or Photoshop to replace the background, but photo contests tend to frown on that sort of manipulation, and many people would argue that it’s somehow ‘cheating’.
I wouldn’t go as far as that, but it does make your job a bit easier if you remember to underexpose in camera. That will affect shadowy areas much more than a brightly lit subject, so it provides a good starting point for any adjustments in post.
Create White Backgrounds
Hippo Floats (taken on an overcast day and showing the reflection of the sky in the waterhole)
You can do the same with white backgrounds—although I don’t tend to do this on a regular basis. One of the advantages is that it makes it easier to cope with an overcast sky.
You can’t exploit the golden hour at sunrise or sunset, but you can still turn the sky into a pure white background. You can even do the same with a snowfield or ice floe.
One thing to look out for is animals in waterholes. If the weather’s cloudy, the reflection of the sky in the water may make it look as if your subject is floating in mid-air!
Low-key

"Tiger, tiger, burning bright…" (taken at -1 EV)
Low-key images don’t necessarily have a black background, but everything’s so dark generally that there are fewer distractions.
I first started taking low-key images on a tiger safari in Tadoba Andhari Tiger Reserve in India in 2017. I happened to overhear him advising a guest to underexpose his images slightly. In hindsight, he was probably just worried about clipping the whites in the tiger’s fur, but I thought, “Go big or go home!”
I took a sequence of images of a Bengal tiger in a waterhole, underexposing by one or two stops each time and cleaning them up in Lightroom. It worked out pretty well, and Paul even chose one of them for the Exodus wildlife calendar that year!
High-key
Mug Shots
I don’t often create high-key images, but it sometimes works pretty well. It’s surprising how easy it is to get rid of grass in the background by simply overexposing it!
The other thing you can do is switch to black and white to try and make it look like a pen-and-ink sketch.
Mist

Horn of Africa
If you’re lucky to witness a misty morning on a shoot or a game drive, it’s a great opportunity to soften your backgrounds and add a sense of mystery.
When I visited the Masai Mara in 2021, I was very unlucky with the weather, and there was only one sunrise when I could even see the sun! However, it was also very misty, so Paul Goldstein and I went out before dawn to take full advantage of the conditions.
The main problem was that the fog was so thick that we couldn’t see any animals! We were in a hurry to get shooting before the golden hour was over, so we rushed around looking for something big—and we eventually found it!
Two Cape buffalo were grazing on the savannah, and we spent the next half an hour taking sunrise silhouettes in the mist. I had the advantage of the longer lens, but Paul had the bright idea of putting the sun in between the horns of one of the buffalos. Honours even…
Snow

White Run (taken in Antarctica in a blizzard—’nuff said!)
Snow is another good way to soften the background. It can either be the snow falling from the sky or the snow (and ice) on the ground. Either way, it’ll hide any distractions and make your subject stand out.
Tin Man Lee wrote recently that the whole reason he’d gone to Torres del Paine in winter was that he wanted to photograph the pumas in snowy conditions, and that’s certainly a good option.
I’ve been to the Antarctic a couple of times, and I was once caught in a ferocious blizzard. It was snowing heavily, but there was also a Force 9 gale blowing, so I couldn’t even turn around for fear of clogging up my lens hood with snow!
However, it gave me the chance to take pictures that I could never have taken in any other conditions. As I often say, bad weather makes for good pictures—as long as you have the right gear!
Streaks of Light
Blue Streak
I often take slow pans of animals and birds, and a great way to improve them is to shoot backlit over water. The highlights on the waves get lengthened by the slow shutter speed so that you end up with dramatic streaks of bright light in the background.
The streaks are attractive in themselves, but they also add to the sense of speed and energy in the photo. Don’t get me wrong, the slow pan is still a tough shot to pull off, but we should be shooting for the stars, right…?!
Verdict

Watch the Birdies
A bad background can easily ruin a photo, but it’s relatively easy to remove or avoid distractions in camera or, if necessary, in post. There are lots of ways of going about it, and the most appropriate technique depends on the local conditions and the kind of shots you’re trying to take.
You can also use the light and the weather to choose positive backgrounds that actually add something to your images—especially at sunset and sunrise or in environmental portraits.
If you’d like to order a framed print of one of my wildlife photographs, please visit the Prints page.
If you’d like to book a lesson or order an online photography course, please visit my Lessons and Courses pages.