Hard to spot…

"Call the Fire Brigade...!"
Leopard sightings are pretty rare, but I went on an Exodus photographic trip to Kicheche Bush Camp in summer 2018 with Paul Goldstein, and that was when I had virtually all my best sightings of leopards.
Here are a few of the lessons I learned from that experience.
Equipment
The first thing I was grateful for was my 800mm Nikon lens.
I remember joining a few vehicles at a leopard sighting in Tanzania once, and a woman in the next truck seemed fascinated by my long lens.
“Wow!” she cried.
“Size isn’t everything!” I joked in reply.
“That’s what I’ve been telling her for the last 20 years!” said her husband…
In fact, the size of your lens is pretty important in wildlife photography.
On a game drive one morning near Kicheche Bush Camp, we pulled up about 25 yards away from the Kaboso leopard, and she put on a real show for us in the trees, turning from one side to the other and even jumping from branch to branch.
As it happened, she was the perfect distance away for me to frame her using my 800mm lens.
Now, I know some photographers think it’s ‘too big to handhold’ or ‘too expensive’, but the optical quality is sensational, and it’s the ideal lens for taking portraits of wildlife with lovely smooth bokeh in the background.
Here are three of my favourite leopard shots taken with my 800mm.

Olympia

"I never liked figs..."
"Is this close enough...?"
It always helps to have great light, of course, but if you find yourself at such a good sighting, it’s important you have the right glass.
Exposure Compensation
Another important thing to remember when photographing leopards is exposure compensation.
You can read my complete guide to exposure compensation here, but the idea is to get the ‘right’ exposure when the camera is being ‘fooled’ by the background being much brighter than the subject.
Whenever I teach people about exposure compensation, my standard example is a leopard in a tree.
The background will often be the sky, and you have to be careful that you expose for the leopard rather than the bright area behind it.
If you don’t use exposure compensation, the leopard will often turn into a silhouette.
Now, that can look great if you’re doing it deliberately at sunset, but you just have to make sure you get the exposure that matches the effect you’re looking for.
So what should you do?
There are three possibilities, depending on what you’re trying to achieve:
Dial in exposure compensation to find the ‘right’ exposure.
Dial in negative exposure compensation (if necessary) to get an underexposed image.
Dial in positive exposure compensation to get an overexposed image.
How do I get the right exposure?
Assuming you just want to get a correctly exposed image, all you need to do is to analyse the scene and work out whether the camera will have a tendency to under- or overexpose and then set the matching amount of either positive or negative exposure compensation using the dial on your camera body.
This works for Aperture or Shutter Priority mode, Program mode or even Manual mode with Auto ISO. Just make sure you get it the right way round!
As a rule of thumb, shooting a leopard against the sky requires one or two stops of positive compensation, but it depends on the size of the subject in the frame and the relative brightness of subject and background.
In the shot below, I used +1 EV, and it turned out pretty well.

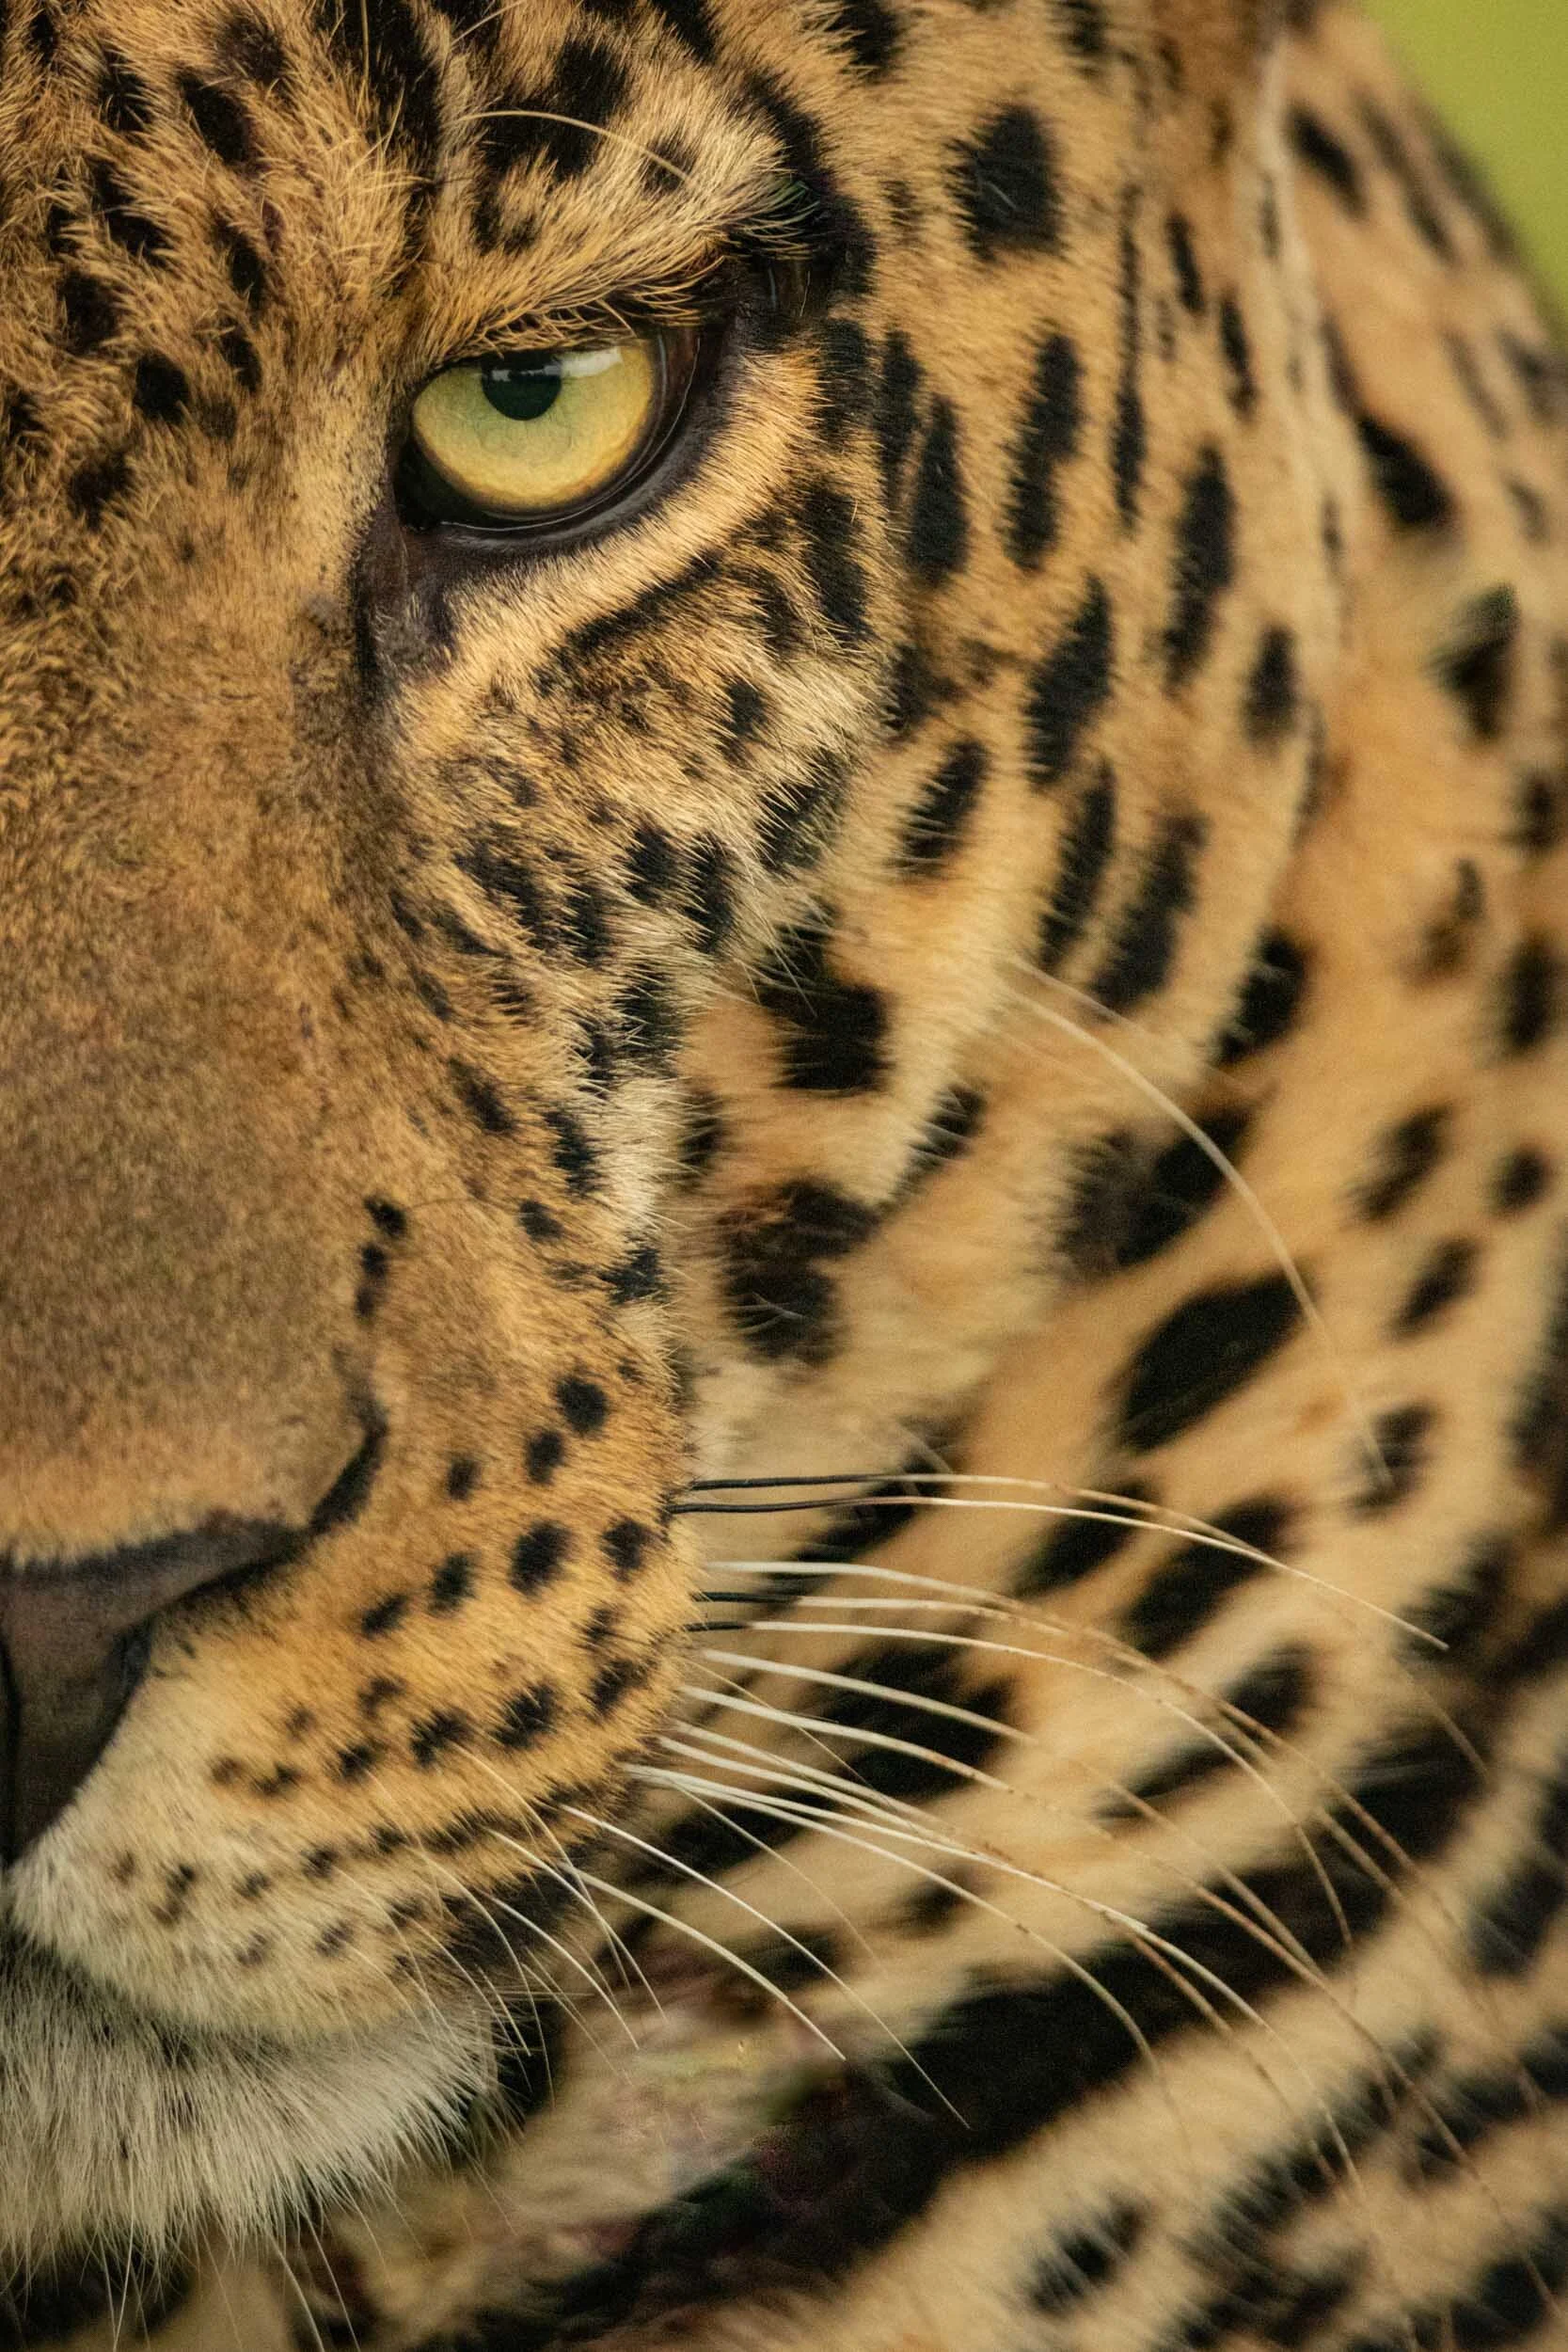
The Eyes Have It!
How do I get an underexposed image?
Most people use exposure compensation to ‘correct’ their exposure, but what if you actually want your image to be darker than normal?
Well, that’s absolutely fine. In the typical ‘leopard-in-a-tree’ shot, you’ll probably end up underexposing anyway if you have a lot of sky in the background, but you can still add a little bit of negative exposure compensation if you wish.
Leopards tend to look good in ‘low key’ portraits in which they’re slightly underexposed.
Exactly how much is just a matter of taste, but I love wildlife shots with black backgrounds, and you can see that effect in the shot below, which I took using one stop of negative exposure compensation.

If you have a bit of time with the leopard, then you can perhaps try out different exposure levels and see which one you prefer.
Just feel free to experiment.
How do I get an overexposed image?
Exactly the same applies to positive exposure compensation. ‘High key’ shots can work just as well as low key shots, especially if you want to turn the shot into black and white so that the leopard looks like it’s white with black spots. All you have to do is add two or three stops of positive exposure compensation.
There’s no right and wrong answer here - it’s entirely up to you…
Other tips
Here are a few more ideas for you when it comes to shooting polar bears:
Leopards spend a lot of time in trees. If you want to see leopards in Africa or Asia, then do tell your driver so he can take you to the most likely spots - and that usually means one of their favourite trees!
Focus on sunrise and sunset. The light is key to great photography, and that’s particularly true for taking pictures of leopards. The ‘Golden Hour’ just after sunrise or just before sunset is the best time of day, and that might involve going to a conservancy such as Kicheche rather than a national park, where you’ll usually be kicked out at just the wrong moment!
Be patient. I’ve seen a lot of leopards, and some of the sightings have literally lasted for hours. Don’t worry. That’s normal. Just wait for the perfect shot. For example, the shot of the leopard in the fork of the tree at the top of this article came just a few minutes after the family in another jeep had given up and gone home. When I showed it to the mother later, she wasn’t happy!
If you’d like to order a framed print of one of my wildlife photographs, please visit the Prints page.
If you’d like to book a lesson or order an online photography course, please visit my Lessons and Courses pages.