
How to use Exposure Compensation
Yet another leopard in a tree…

Olympia
Whenever I teach people about exposure compensation, I always find myself using the example of a leopard in a tree: “The sky behind is bright, but the leopard is dark, so you have to use a stop or two of exposure compensation.”
The idea is to get the ‘right’ exposure for the subject when the camera is being ‘fooled’ by a background that is either much brighter or much darker. One ‘stop’ or EV (Exposure Value) of exposure compensation either doubles or halves the light level, and you generally won’t need more than a couple of stops in most cases.
But why does this happen?
Why do I need exposure compensation?
Cameras don’t ‘know’ what’s in front of them, so they don’t ‘know’ what exposure settings to use. As a result, the manufacturers program them to expect the world to look like 18% grey.
In fact, the colour doesn’t matter, but the 18% refers to the amount of light that’s reflected by the subject. This is in fact halfway between white and black (don’t ask me why!), and it does roughly represent the amount of light that’s reflected by the world in general. It’s also conveniently the amount of light reflected by Caucasian skin tones.
That means that the in-camera exposure meters will accurately predict the required exposure if they’re faced with something that actually does reflect 18% of the light.
However, there are always exceptions.
If the scene contains elements that are naturally darker than that, such as a black bear in a dark forest, then the camera will overcompensate and lighten it too much. “Ah, this must be an 18% tone,” thinks the camera, “but I’m only getting a reading of 4%, so I’m going to have to overexpose it until it reaches 18%.”
The opposite happens when the scene is naturally brighter than 18%, and the camera will (quite understandably) underexpose it because it thinks that it’s ‘actually’ an 18% tone that’s just really brightly lit.
So what should you do?
There are three possibilities, depending on what effect you’re trying to achieve:
Dial in exposure compensation to find the ‘right’ exposure.
Dial in negative exposure compensation to get an underexposed image.
Dial in positive exposure compensation to get an overexposed image.
How do I get the right exposure?
Assuming you just want to get a correctly exposed image, all you need to do is to analyse the scene and work out whether the camera will have a tendency to under- or overexpose and then set the matching amount of either positive or negative exposure compensation using the dial on your camera body.
This works for Aperture or Shutter Priority mode, Program mode or even Manual mode with Auto ISO. Just make sure you get it the right way round!
As a rule of thumb, dark scenes need negative exposure compensation and bright scenes need positive, but it depends on the size of the subject in the frame and the relative brightness of subject and background.
It’s the average brightness of the elements in the frame that matters: if it’s more than 18%, use positive exposure compensation; if it’s less than 18%, use negative.
This is ALWAYS true, whether your actual subject is bright or dark.
This might seem a bit complicated, but here are a few typical situations:
If the subject fills the frame:
dial in positive exposure compensation for a bright subject (ie reflecting more than 18% of the ambient light), eg a polar bear
dial in negative exposure compensation for a dark subject, eg a black bear
don’t use any exposure compensation for a mid-tone subject, eg a (Caucasian) person’s face
If the subject is relatively small in the frame, but both subject and background are roughly the same tone:
Dial in positive exposure compensation for a bright subject/scene, eg a polar bear on ice.
Dial in negative exposure compensation for a dark subject/scene, eg a black bear in a dark forest.
Don’t use any exposure compensation for a mid-tone subject/scene, eg a (Caucasian) person sunbathing on a grassy lawn.
If the subject is relatively small in the frame and is a different tone from the background:
Dial in positive exposure compensation for a bright background, eg a leopard seal on a giant ice floe.
Dial in negative exposure compensation for a dark background, eg a polar bear on a scree slope.
Don’t use any exposure compensation for a mid-tone background, eg a polar bear OR a black bear sunbathing on a grassy lawn…!
How do I get an underexposed image?
Most people use exposure compensation to ‘correct’ their exposure, but what if you actually want your image to be darker than normal?
Well, that’s absolutely fine. You can still use negative exposure compensation to do it.
There’s no law against taking ‘low key’ shots, so feel free to experiment. I particularly like wildlife images with black backgrounds, and the easiest way to make that happen is to dial in a couple of stops of negative exposure compensation.
How do I get an overexposed image?
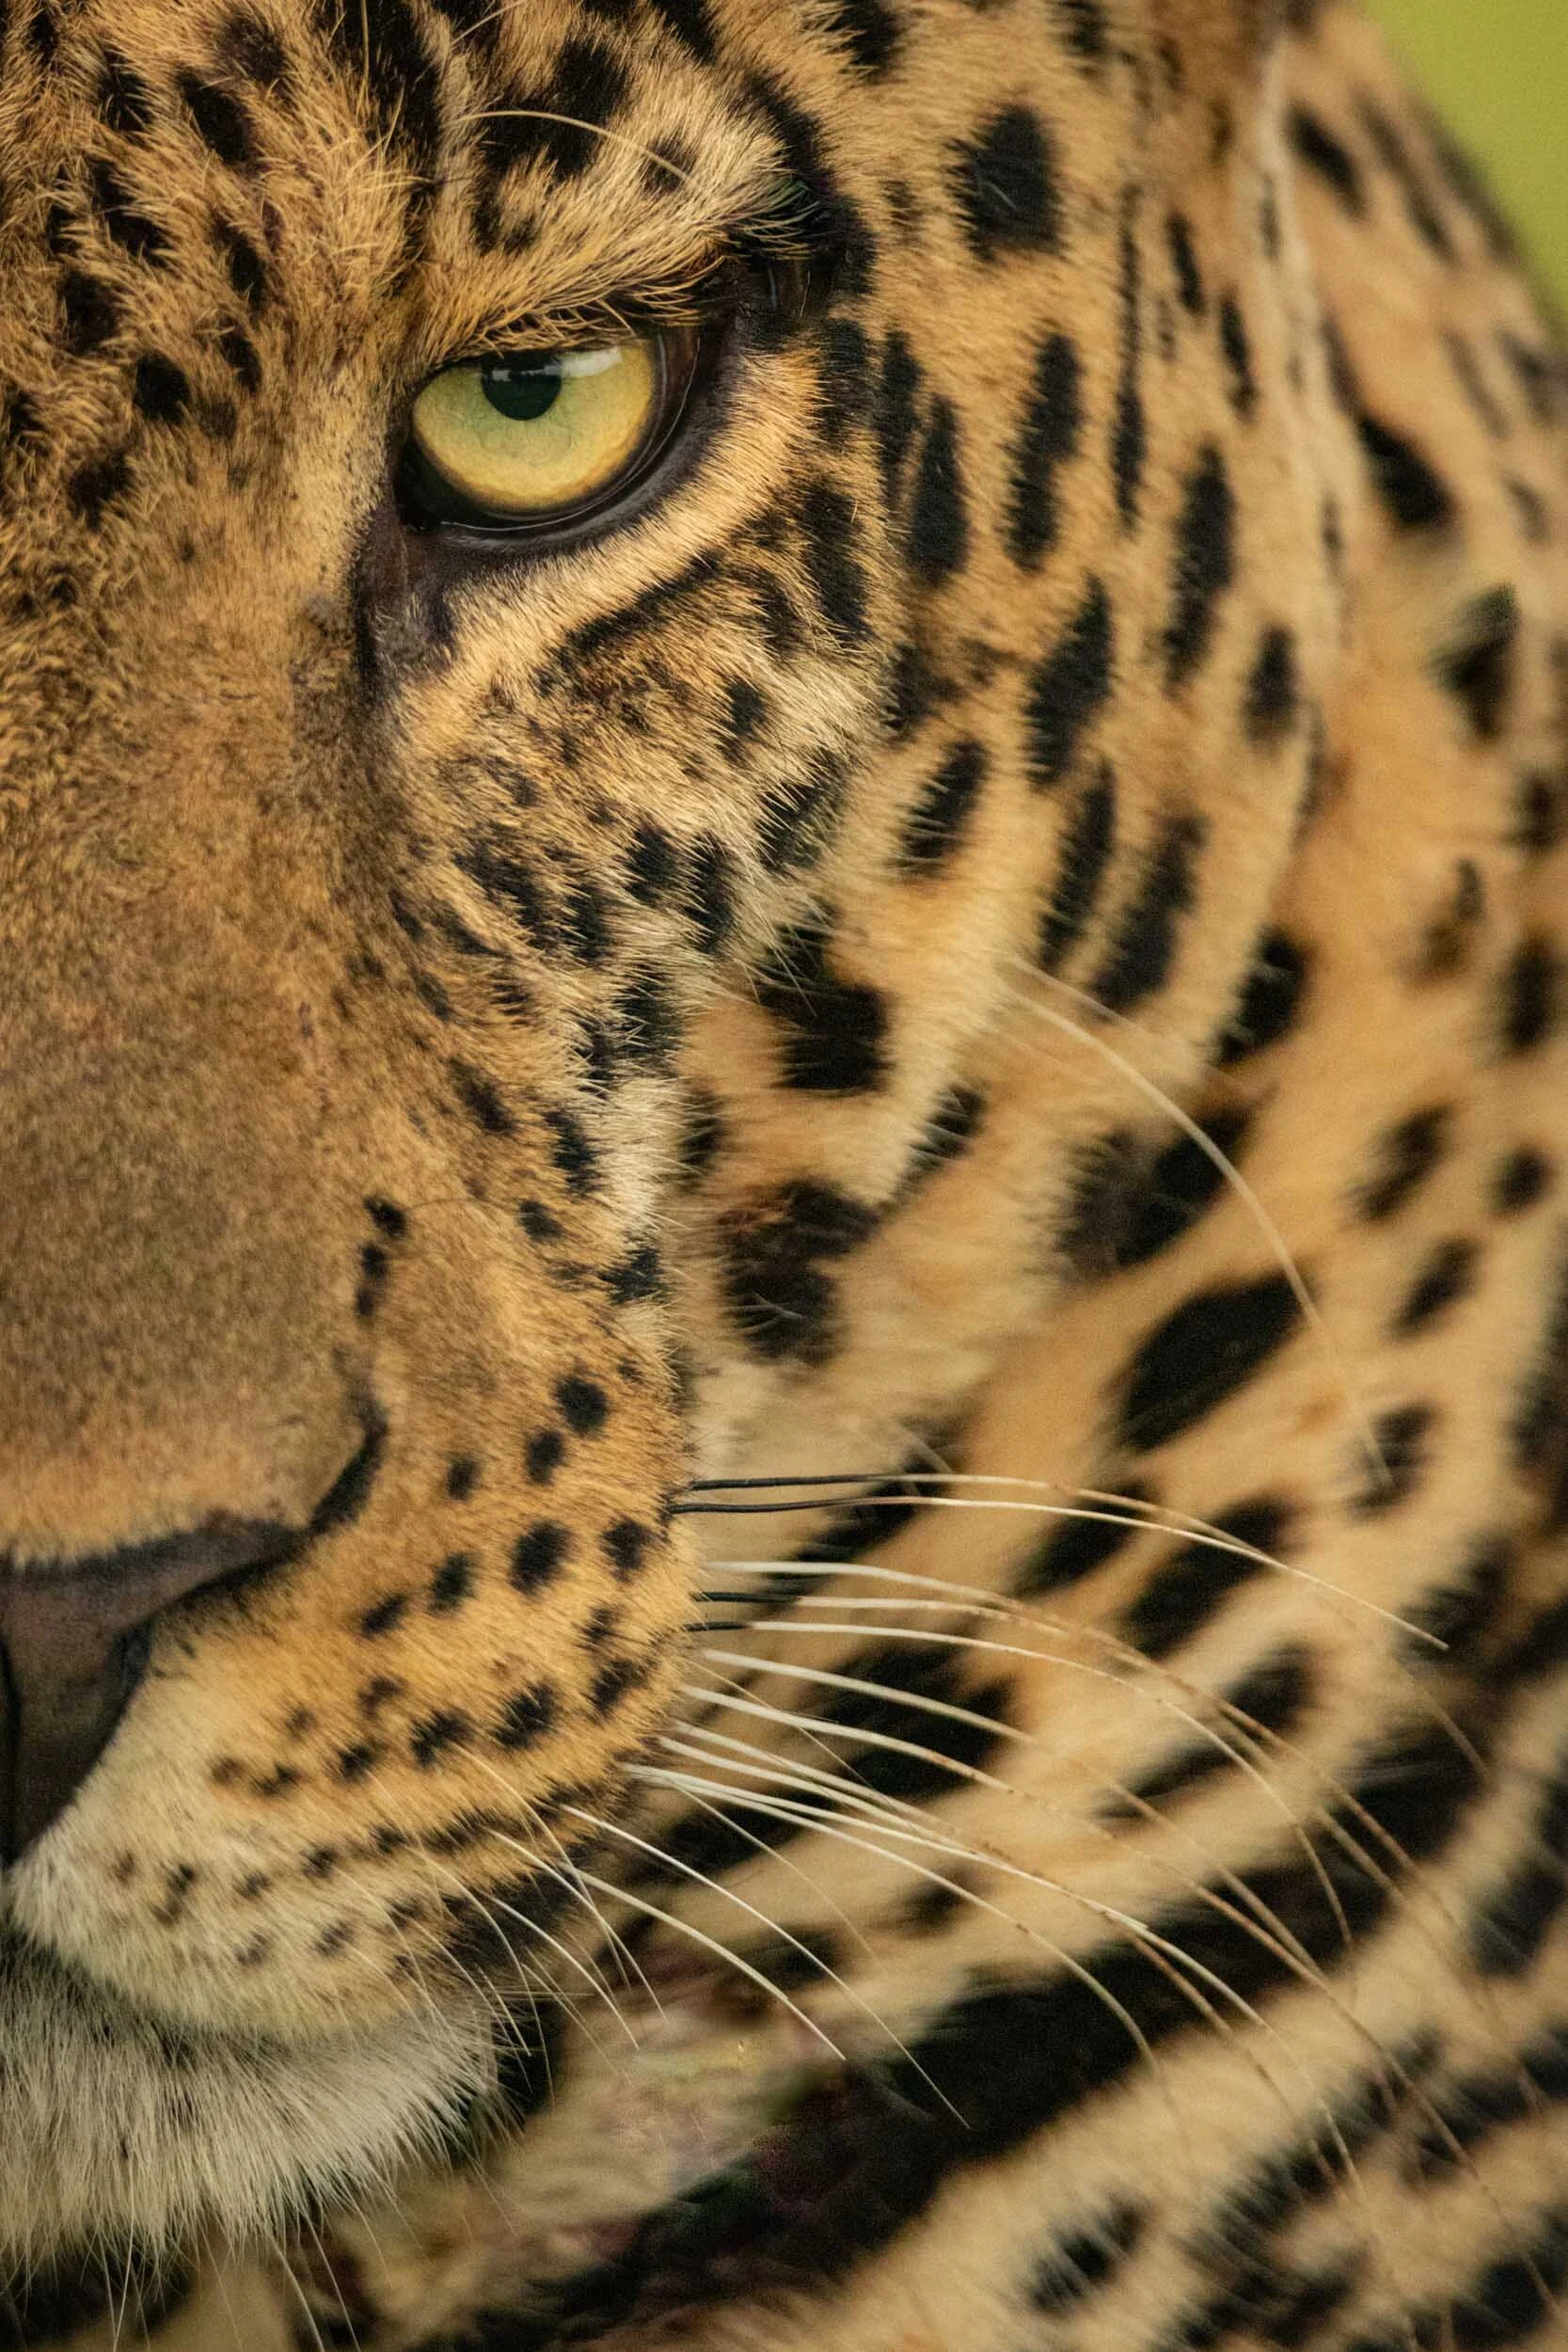
Exactly the same applies to positive exposure compensation. ‘High key’ shots can work just as well as low key shots, especially if you want a plain, grassy background to ‘disappear’. All you have to do is add a couple of stops of positive exposure compensation. It works particularly well with animals such as leopards that have spotted coats.
Is there any other way of doing it?
Yes, there is. You don’t have to use exposure compensation if you don’t want to. In fact, if you set the shutter speed, aperture and ISO manually, then it simply won’t work as the camera’s exposure meter isn’t having to do anything. Instead, you’ll have to adopt one of these approaches:
Take full manual control. Set the shutter speed, aperture and ISO yourself and then simply check the meter in the viewfinder to see how much exposure compensation you’re adding.
Use spot metering. If you change the settings so that your camera uses spot metering, it will take the exposure reading from a very small area in the frame. That means it won’t be ‘fooled’ by a background that is much darker or lighter than the subject. However, it only works if you have a mid-tone subject. Obviously, using spot metering on a black bear or a polar bear won’t let you escape having to under- or overexpose your images…
Lock the exposure. On most cameras, there is an AE-Lock (Automatic Exposure Lock) button on the back. If you’re worried about over- or underexposure, simply prefocus on a mid-tone object such as a patch of grass and then lock your exposure by pressing the AE-Lock button. This is particularly useful for bird photography as the birds will generally be set against a very bright sky. (If you use back button focusing already, then this will probably come very naturally…)
Quiz
Just for fun, here’s a quiz to see if you were paying attention!
These are a few of my favourite shots. Try and guess what the exposure compensation value was for each one. The answers are shown below.

A

B
C

D

E

F

G
H
I

J
Answers:
A. -1 EV
Yes, this is a leopard in a tree, but I didn’t need to use positive exposure compensation as there was no sky behind. Instead, the one stop of negative exposure compensation darkened the background, helped saturate the colours and made the leopard stand out.
B. -2 EV
I took this on a bright, sunny day, so I needed two stops of negative exposure compensation (and extensive work in Lightroom!) to create the black background.
C. -2 EV
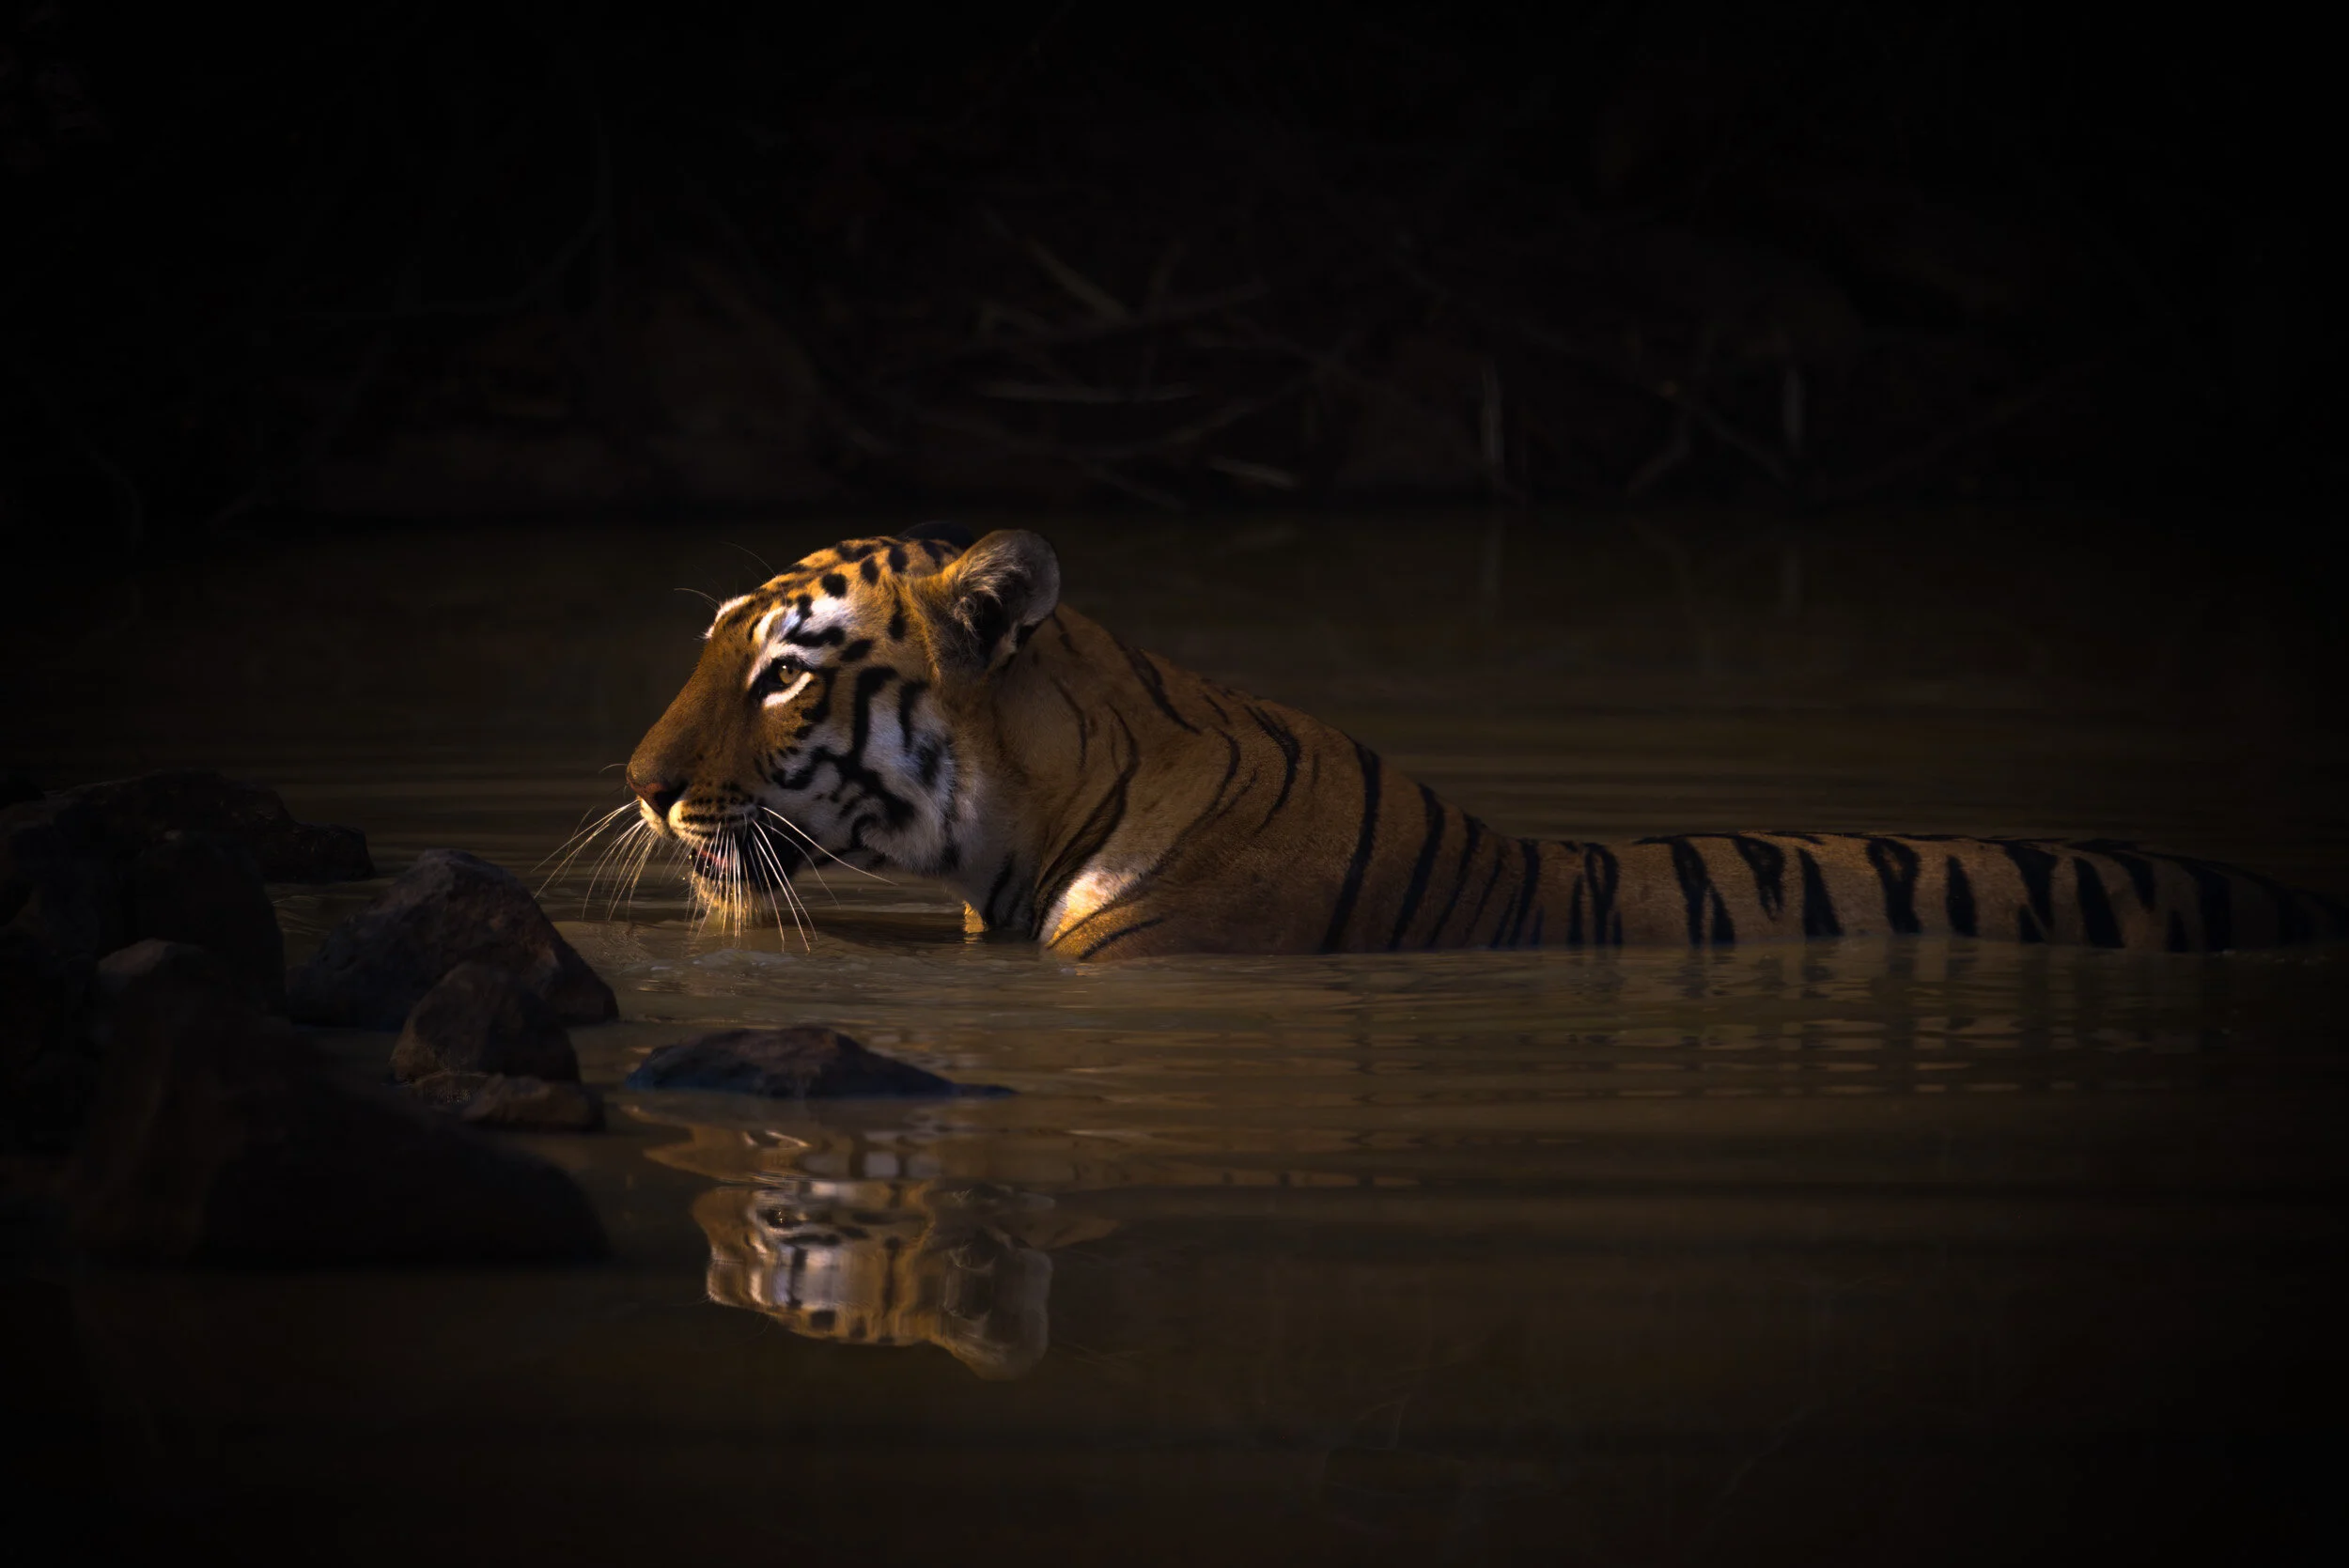
Believe it or not, it was 47 degrees Centigrade without a single a cloud in the sky when I took this shot. I happened to overhear Paul Goldstein advise one of the guests to underexpose slightly to avoid overexposing the white patch of fur on the tiger’s chest, but I just thought, “Go big or go home…!”
D. +2 EV
I was with Paul again when we drove past this hippo in a man-made waterhole. It was overcast, and I noticed that the water was so still that it made it look as if the hippo was floating in mid-air. I overexposed it by two stops as the water was so bright, and I wanted it to be as white as possible in the final image.
E. -1 EV
I usually don’t use any exposure compensation for shots at sunrise or sunset as the camera will automatically make animals on the horizon into silhouettes to compensate for the brightness of the sky. However, I had time to experiment, and I kind of like the looming, indistinct form of the buffalo in the darkness.
F. +1 EV
This is your ‘typical’ leopard-in-a-tree shot. The sky in the background was bright, so I overexposed by one stop. Job done.
G. +1 EV
Here, the the penguins’ coats were largely white, and the water in the background was quite reflective, so I overexposed a little.
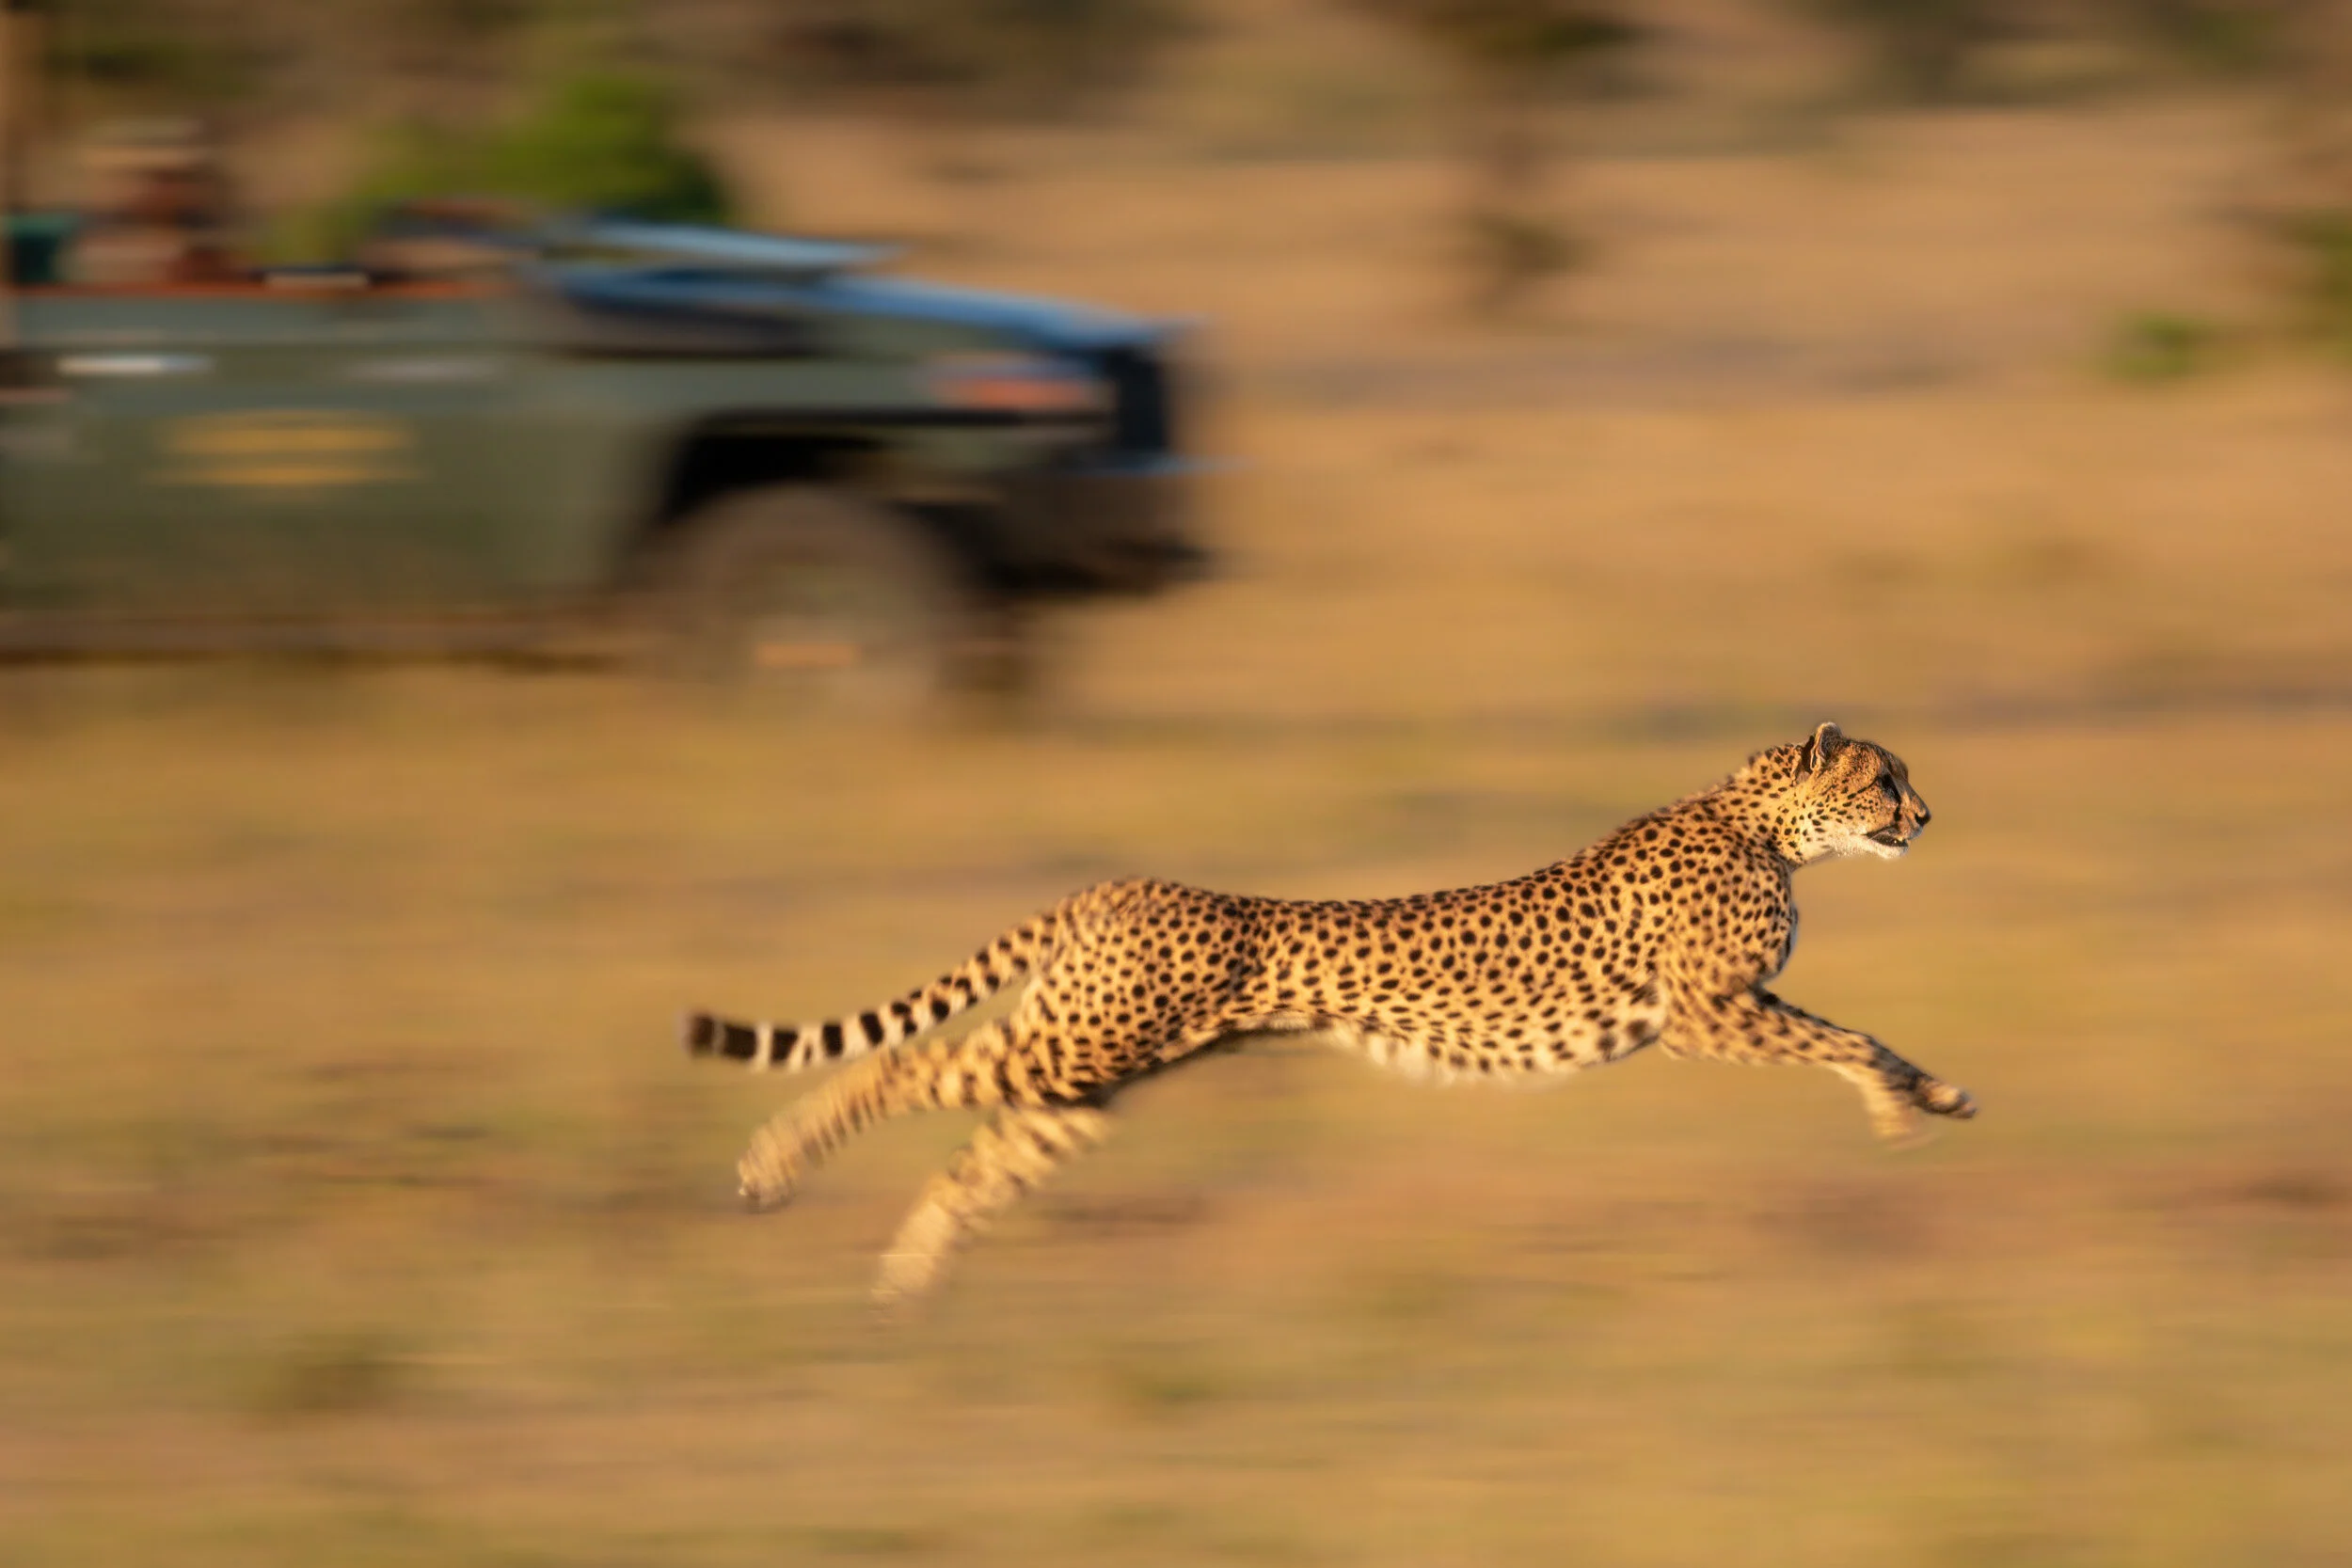
H. +1/3 EV
Apologies for the fraction, but Paul Goldstein persuaded me to add 1/3 of a stop of positive exposure compensation just because he said he preferred it with slow pan shots of cheetahs…!
I. 0 EV
This was a tricky situation. It was after sunset, and the light level was very low. It would’ve been easy to ‘cheat’ the ISO down by using negative exposure compensation, but then I’d only have had to lift the exposure in Lightroom, and that would’ve meant sacrificing quality. Cameras are designed to operate at their best when the exposure is correct, so you should always try to get it right at the time. Yes, the ISO would’ve been lower with negative exposure compensation, but the final image would’ve suffered from all the usual problems of boosting the exposure in post, including increased noise levels, lack of contrast and poorer colour saturation. Just say no.
J. 0 EV
Again, it was getting very dark when I took this picture, but there was no reason to use exposure compensation except to ‘cheat’ the ISO down, and that would’ve spoiled the final image.
If you’d like to order a framed print of one of my wildlife photographs, please visit the Prints page.
If you’d like to book a lesson or order an online photography course, please visit my Lessons and Courses pages.