
10 Classic Safari Shots
Number One…!

"Behind you!"
To my knowledge, not many photographers who go on safari put together a shot list in advance. That’s not necessarily a bad thing, but it’s worth considering so that you can make the most of your experience. The last thing you want to do is come home kicking yourself you didn’t get a shot of a leopard or a cheetah hunt.
Here are what I consider to be 10 classic safari shots plus tips on how to take them. It’s not an exhaustive list, and you might have others you think are more important, but it’s a good starting point.
#1 Cheetah Hunt

It's All Downhill From Here
The Idea
To me, there’s nothing more exciting in wildlife photography than seeing a cheetah hunt. The speed of the animals, the intensity of the experience (which only lasts a few seconds!) and the final outcome (a takedown or kill) make it the most photographable moment on safari.
That’s not to say it’s easy. The first problem is that kills by the big cats are very rare. I’ve only seen around a dozen kills by lions, leopards and cheetahs in over 350 game drives! That means you only have around a 3% chance of seeing one on any given outing.
Another difficulty comes with trying to take decent pictures of something that usually happens a long way away, involves animals running at 50-70 mph and only lasts a few seconds! The first time I saw a kill, I was with Paul Goldstein in the Masai Mara. He told me all the settings I needed, but I was in a total panic, ended up focusing on the wrong animal and only managed one shot—and even then, it needed a lot of work in Lightroom (see “Behind you!” above)!
On that first trip, I was lucky enough to see five cheetah kills in a week (plus various other hunts). The second time I went with Paul to Kicheche, I only saw one, and the same happened on my most recent trip last week. However, the chase lasted a (relatively) long time, so I managed to get a few good shots—including the one at the top of this section).
The Technique
Cheetahs can lie around doing nothing for hours, but when they start to hunt, the action can sometimes come out of nowhere, so you need to be ready. There are a few key things about photographing a cheetah hunt that you have to get right:
Location. In order to follow a cheetah hunt, you really need to be able to go off-road. That’s almost always forbidden in the national parks, so it’s much better to go to a camp like Kicheche in a private conservancy, where you can go anywhere you like.
Positioning. This is down to your guide and/or driver, and the reason I keep going on trips with Paul Goldstein is that he’s the best I’ve ever seen at getting you where the action is. The vehicle needs to be in the right place, which is either ahead and to one side of the likely path of the cheetah or around 50 yards behind its prey. In addition, it’s a good idea to make sure the roof is off and stand up in the vehicle so that you have a 360° field of view. It helps to have a bean bag to rest your camera on in some situations, but I like the freedom and flexibility of shooting handheld. Just make sure you have plenty of space to yourself. At the crucial moment, you don’t want to be bumping elbows with one of the other passengers!
Equipment. These days, mirrorless cameras such as my Sony ⍺1 boast incredible resolution, frame rates and autofocus systems, and they can be customised to speed up your workflow. I’m a great believer in the Two-second Rule, so every moment counts! With all due respect to Chase Jarvis, this is one of those times when the best camera is definitely NOT the one that’s with you (especially if it’s only an iPhone!), so you might need to pay for an upgrade…
Settings. You need to dial in all the right settings in good time to give yourself the best possible chance of success. Generally, I shoot wide open in manual with auto ISO at a default shutter speed of 1/1000 of a second and 30 fps, but that’s not really good enough for a cheetah hunt. If you want to freeze any action, it’s wise to shoot at a shutter speed of 1/1600 or more. (Paul likes to slow pan cheetah hunts, but that’s a whole different story!) If you want both the cheetah and its prey to be sharp, you need to stop down to around f/8—especially if they’re heading directly towards you.
#2 Mating Lions
Lions Rampant
The Idea
If you go somewhere like the Masai Mara or the Serengeti, you might see lions mating. If you do, the great thing is that they’ll probably carry on mating for a good few days. In fact, lions generally mate for a whole week (without hunting or feeding!) at intervals of 10-20 minutes, so you’ll get plenty of chances to hone your technique.
At Klein’s Camp in Tanzania a few years ago, I was lucky enough to see 29 lion matings! That was extraordinary, and I learned a lot from the experience.
The Technique
If you’ve never seen lions mating, you might be surprised about how it normally pans out. The actual act itself only lasts a few seconds, and it generally happens in silence without much movement—apart from the male lion nibbling the ears of the lioness while doing the deed!
The key moment comes when the male withdraws his member, which has barbs on it that cause the female discomfort and even pain. As a result, she will often snarl and try to slap the male after he dismounts.
If you’re trying to photograph all this, there are a number of things you need to bear in mind:
Give your driver instructions. Some of the better guides and drivers in Africa have a decent appreciation of what photographers need, and they can be relied upon to put you in the right position most of the time. However, photographing mating lions is a specialist skill, and I always try and have a word with my driver before things kick off. It’s important to keep the engine running and the car in gear while you’re waiting, and once mating begins, you need to be ahead of the lions so that you can see their facial expressions. That demands pretty quick reactions from you and your driver!
Time the gaps. You know the average interval between matings, so it helps to set an alarm on your phone to let you know when it’s about to happen again. Mating happens without almost any foreplay, so you need to be ready and waiting at the crucial moment.
Get ready for action. Again, we’re talking about action shots involving two animals, so you need to make sure you have a high enough shutter speed to freeze any movement (1/1600+) and a narrow enough aperture to keep both male and female in focus.
#3 Elephant Dust Bath
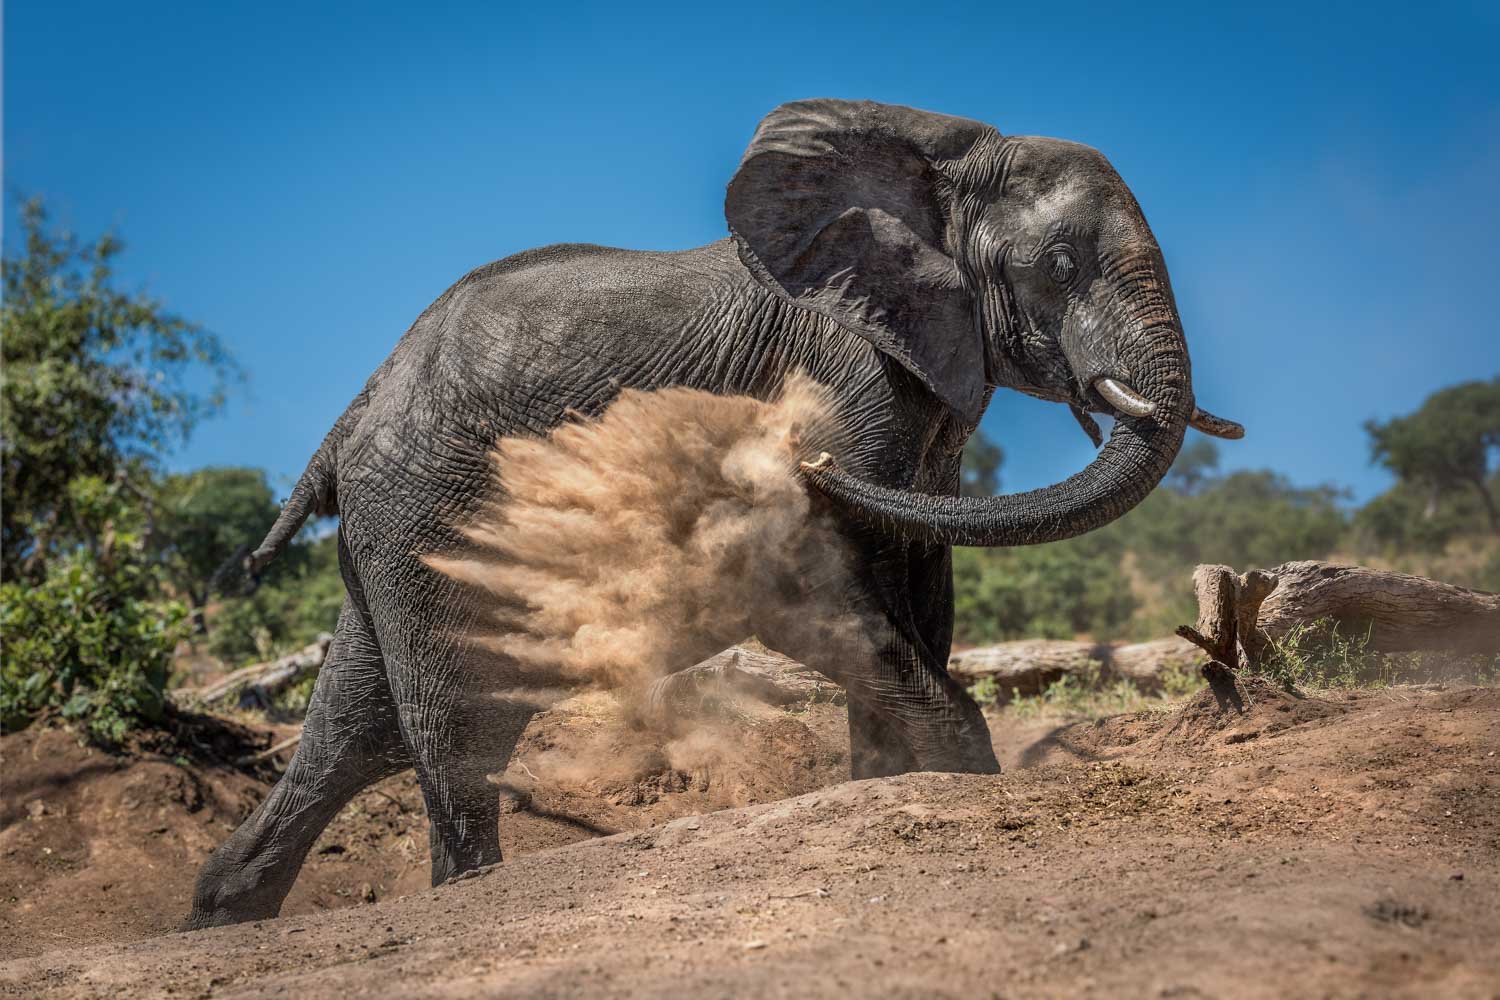
Dustbuster
The Idea
I’m not much of a fan of photographing elephants. I find the trunk and tusks make their faces so unlike those of humans that it’s hard to take good portraits of them. That may just be a personal prejudice, but I do like taking pictures of an elephant enjoying a dust bath.
A dust bath (or mud bath) is a great chance for an action shot. The explosion of earth against the elephant’s flank is very photogenic, and, as with lions mating, you generally get the chance to take quite a few shots.
Botswana has more elephants than any other country in the world, so it’s a great place to photograph them. I’ve visited Chobe National Park three times, and the advantage of being on the river is that you can go on boat rides. In fact, that’s what I was doing when I took the picture above. The river itself is always very calm and smooth, so a boat makes the perfect platform for taking pictures.
The Technique
Go on boat rides. The key to finding elephants taking dust or mud baths is to go on as many boat rides as you can. The elephants gather on the riverbank to drink, and they either use the sand on the beach for dust baths or create ‘wallows’ where they can throw mud over their bodies to cool off and protect themselves against insects—and sunburn!
Choose the right shutter speed. The most important setting for capturing a dust bath is the shutter speed. There is no single ‘right’ value, though. It depends on the effect you’re after. If you want to freeze the earth or mud in the air, you should choose a high shutter speed (1/1000+), but a lower value will introduce creative motion blur that you might find preferable.
To give you an idea, I took the shot above at 1/500 of a second, and you can see that some of the dust is a bit blurred at the edges. It’s just a matter of taste, so you should experiment with different shutter speeds to see what works best for you.
#4 Leopard in a Tree

Olympia
The Idea
If you ask guests on safari what their favourite animal is, most will say the leopard. It’s a beautiful cat, and its spotted coat and blue or green eyes make a winning combination. However, it’s surprisingly hard to find.
In Africa, there are around 700,000 leopards and only 20-25,000 lions, but it’s far easier to spot a lion than a leopard! Why is that?
Personality. Leopards are solitary creatures and prefer to live and hunt on their own, whereas lions are often found in prides.
Hunting methods. Leopards are ‘ambush hunters’, which means they tend to lie in wait for their prey rather than chasing after them like a cheetah.
Trees and caves. Leopards aren’t as big or powerful as lions, and even hyenas will give them a run for their money, so they like to hide their kills in trees or caves.
The Technique
If you’re lucky enough to get a leopard sighting, you probably won’t have it all to yourself for very long. Most drivers on safari have radios, and the news of a leopard sighting doesn’t take long to do the rounds!
That means you need to make the most of your chance. Here are a few things to bear in mind:
Patience. Leopards are rare, but they’re also quite uncooperative sometimes! It takes a lot of patience to wait for the right moment when the leopard is visible and there are no distracting leaves or branches in the way.
Backlighting. Leopards in trees will be backlit most of the time, so you need to make sure your shots aren’t too dark. The easiest way to do that is to use positive exposure compensation (if you’re in one of the automatic exposure modes) or dial up the ISO (if you’re shooting in full manual).
Low-key portraits. If there’s no sky visible, leopards make a great subject for low-key portraits. The one, crucial element that you need is a shaft of sunlight on the face of the animal. As soon as you have that, you can underexpose by as many as four stops. The highlights will be bright enough to remain visible while the background will become a gloomy blur.
#5 Rhino

Eye of the Rhino
The Idea
Rhinos are even harder to see than leopards. There are around 6,500 black rhinos and 17,000 white rhinos in Africa. The numbers are rising slowly, but there’s a long, long way to go to protect them successfully from poaching and habitat loss.
As well as the rarity value, what draws me to rhinos is their almost Jurassic appearance. With their double horns, they look a bit like the Triceratops, and it’s an extraordinary experience just to come across one, let alone photograph it.
The Technique
Rhinos (and particularly black rhinos) are rare and shy, so the main difficulty involves finding them in the first place. Here’s what you need to do:
Go to the right place. There are plenty of places in Africa where you just won’t see any rhinos, so you need to do your research in advance and choose the right destination. In my experience, the best place to go is a rhino sanctuary called Ol Jogi in Kenya. I saw black rhinos every day there, and I was able to take hundreds of shots (including the one above).
Black or white. Black rhinos are browsers (feeding on leaves) while white rhinos are grazers (feeding on grass), so you need to know the difference and ask yourself in advance which one you’re looking for as you obviously need to go to different places with different vegetation.
Stealth. Black rhinos can be very shy, so you need to be careful when you first spot one. It’ll probably just turn and run, so it’s advisable to be as stealthy as possible in your approach. You’re unlikely to be able to get very close at the best of times, so having a long lens (400mm+) is a must!
Side lighting. The dramatic outline of a rhino makes a great portrait if you have strong side lighting, either in the early morning or late afternoon. If you underexpose by a few stops and play around with your image in post, you might end up with something like this (see above).
#6 Lion Portrait
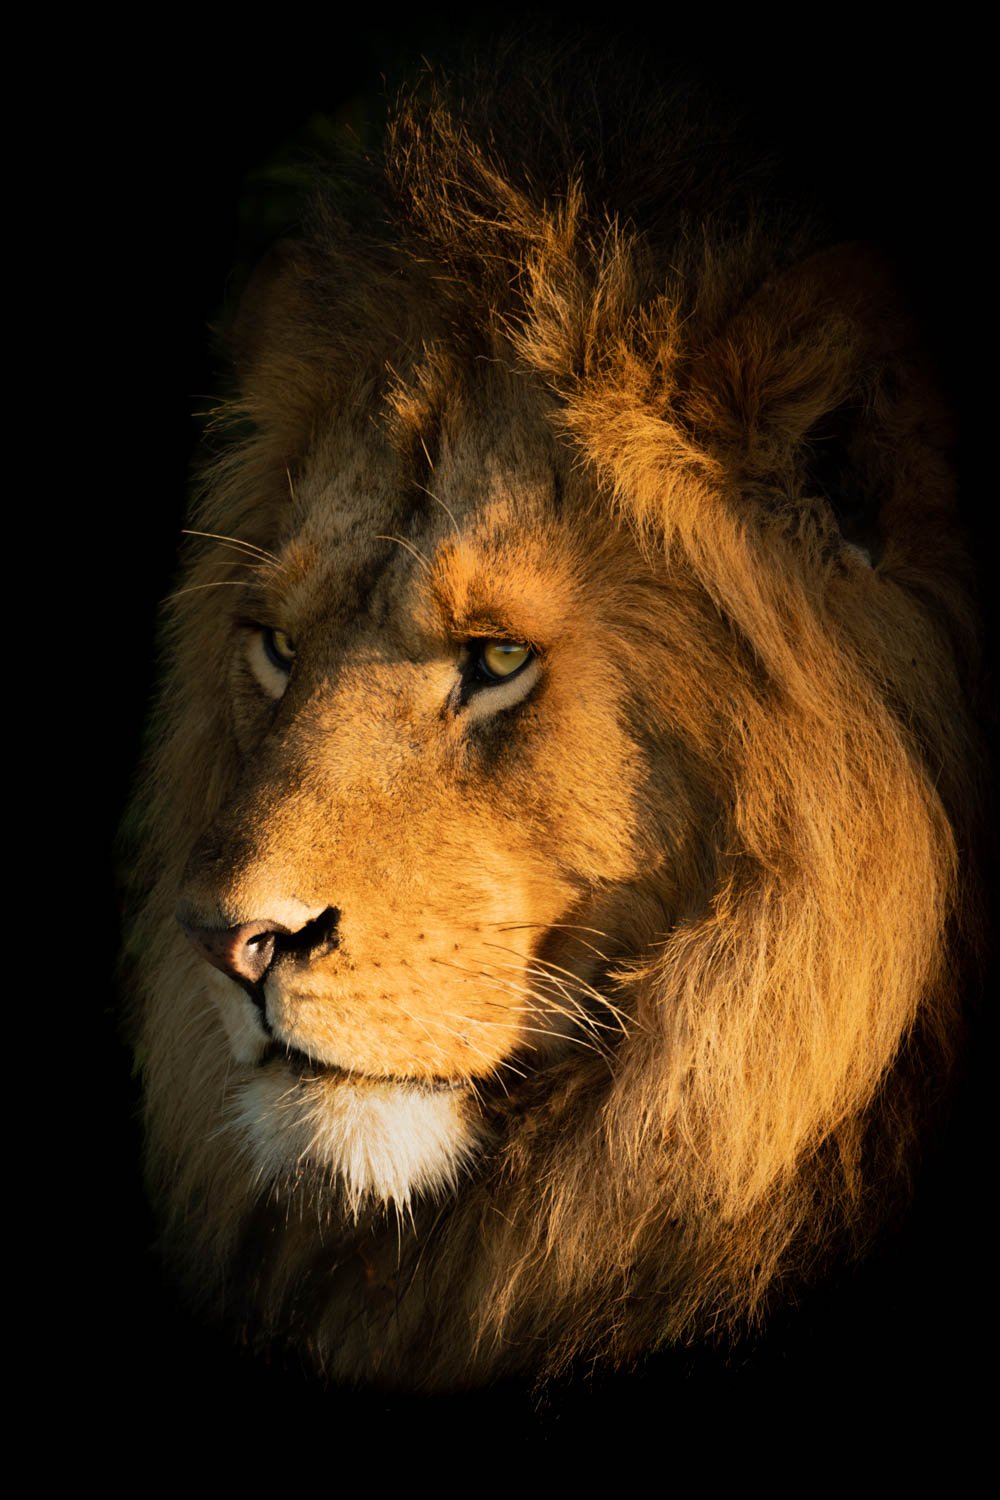
He-Lion
The Idea
As we all know, the lion is either the King of the Beasts or the King of the Jungle. As such, it has a privileged place in the safari bestiary. Anyone who’s seen The Lion King probably dreams of photographing a male lion high on a cliff, dominating all he surveys—or maybe that’s just me…!
The lion is the biggest of the big cats in Africa, and the male of the species has the added attraction of a mane—which is often black in the Masai Mara. It’s a superb symbol of the African wilderness, so it’s no surprise almost everyone wants to see one.
The only problem is that lions spend 20-22 hours a day lying around sleeping! That means you have to be very patient or prepared to come back later. Much later!
The Technique
In order to produce a regal portrait, it helps to find the right subject at the right time of day. Ideally, that means a male lion (sorry, ladies…!) during the golden hour either just after sunrise or just before sunset.
The golden light of the sun is very flattering to animals with golden coats, and the other advantage of shooting in low light is that you have a better chance of creating a black background. This is a great way of producing chiaroscuro (or light and shade), which can create a dramatic image like the one above.
#7 Bird in Flight

Blue Bird
The Idea
One of the problems with trying to photograph safari animals is that it’s very hard to take action shots. I always think it’s a bit like being in the army: 99% boredom and only 1% excitement!
If you can’t face waiting around for the cats to hunt, another option is to take bird-in-flight shots. Africa has many birds of prey, such as the African fish eagle, and many colourful birds, such as the lilac-breasted roller and the little bee-eater. They both tend to stick around the same neighbourhood, and that offers you plenty of chances to take pictures of them.
My personal favourite is the lilac-breasted roller, and I enjoy taking pictures as it takes off from a branch or tree stump. Ideally, you want the wings to be spread or raised, so everyone can see the beautiful colours of its plumage. It’s also nice if you can capture the bird just touching the branch as it’s about to take off—but that needs either very good timing or a lot of luck!
The Technique
This is definitely the kind of shot that requires patience and preparation. You can’t simply spot a bird and hope to take a picture of it within a few seconds. You need to take up the right position and dial in all the right settings:
Wind. As most of you probably know, birds like to take off into the wind. If you want pictures of faces rather than butts (!), that means asking your driver to place the vehicle downwind so that the bird flies towards you.
Patience. You can’t expect birds to take off to order. That means you have a couple of options. You can either wait (and wait!) to get your shot, or you can ask your driver to, ahem, ‘encourage’ the bird to fly away. Exactly what you’re prepared to let him do depends on your ethical viewpoint, so I’ll leave that up to you…!
Settings. If you want to freeze the bird in flight (including its wings), it’s a good idea to use your highest frame rate and a shutter speed of around 1/3200. Any slower than that, and you’ll start to get blurred feathers on the wingtips. Either approach is fine, aesthetically speaking, but you just need to decide what look you prefer. It’s usually best to shoot wide open to throw the background out of focus, but a narrower aperture provides a greater depth of field, which means you’ll have a better chance of keeping the bird sharp if you don’t quite nail the focus. That’s especially true when photographing tiny birds like the little bee-eater, which are too fast even for Sony’s eye detection!
Camera technique. To get a shot of a large or medium-sized bird, you should get set up in a comfortable position and wait for it to take off. At that moment, you should stay still and keep your camera in the same position while you take a quick burst. Your reactions should be good enough to get a few frames with the bird in shot. However, smaller birds like little bee-eaters move so quickly and unpredictably that it’s wise to take frequent, short bursts every second or even every half a second. That can be a heavy drain on your memory card, so you need to decide if it’s worth it!
#8 Sunset Silhouette
Eland Horizon
The Idea
If you want to take more colourful images, you can always try to capture wildlife at sunrise or sunset. I always like to start my morning game drive by looking for sunrise silhouettes, and I try to set up for the same sort of thing at sunset.
Bad weather can always throw a spanner in the works, and it rained every day on my recent trip to the Masai Mara. However, I still got a couple of good sunrises and sunsets to practise my craft (see above).
The Technique
Taking shots at sunrise and sunset is surprisingly easy if you don’t mind the animals turning into silhouettes. Cameras are designed to expect the scene in front of them to reflect 18% of the light from the sun. If a bright sky covers most of the frame, they’ll automatically try to darken it so that they can hit their exposure target. That means your ‘default’ sunrise or sunset shot will create a silhouette against a colourful sky.
Here are a few other variables to consider:
Location. Finding a good location for sunrise and sunset shots can be tricky. Ideally, you need a cambered plain that slopes up towards the east at dawn or the west at dusk, but that’s not always practical—especially if the wildlife doesn’t cooperate! The other problem is that national parks usually open at sunrise and close at sunset, so you’re better off going to a private conservancy instead.
Weather. The weather is the biggest single factor affecting the quality of the sunset. You need to see the sun, so it can’t be too cloudy, but you also need the sky to be interesting, so that means having at least a few picturesque clouds. Unfortunately, you can’t control the weather, so you just have to take what comes…
Exposure compensation. If you want the sky to be darker or lighter, you can simply play around with exposure compensation (or the ISO if you’re in full manual mode). Underexposing tends to add saturation to the colours and make them a little redder. Overexposing does the opposite.
Timing. One thing I learned (again!) in the Mara is that the sunrise or sunset lasts longer than you might think. In equatorial Africa, the sun goes up and down almost vertically, which means twilight (either at dawn or dusk) doesn’t last very long. However, there’s colour in the sky from a few minutes before the actual sunrise or sunset, and it takes a few minutes to disappear completely afterwards. That means you have a little longer to take your pictures—and you can always adjust the brightness using exposure compensation (or the ISO dial if you’re in manual).
Settings. I’ve recently changed the way I set up for sunrise and sunset shots. If the sun is in the frame, there’s always enough light to shoot at the minimum native ISO (which is 100 on my Sony ⍺1). I obviously want to shoot at that value all the time, and it’s a bit fiddly to try and achieve that indirectly by changing the shutter speed, so I now switch to aperture priority mode. That way, I can manually set the ISO to 100, set a narrow aperture (such as f/16) to keep both subject and sky in focus and let the camera worry about the least important variable, which is the shutter speed. Again, I can always use the exposure compensation dial to adjust the brightness of the images.
#9 Cubs
The Idea
Everybody knows cubs are cute, and cute sells. That’s why it’s always worth trying to photograph baby animals playing with one another—especially lion, leopard or cheetah cubs.
The trouble is that there might not be any cubs near the camp. Again, it’s just a matter of luck, but it’s worth checking to avoid disappointment—either when you’re actually in camp or, ideally, before you book your trip.
In addition, the type of cat matters:
Lions give birth to litters of two to six cubs.
Leopards have two or three cubs.
Cheetahs have one to eight cubs, with four being the average.
The Technique
If and when you find cubs, you need to bear in mind a few of the issues. Cubs are small, so getting as close to eye level as possible is important—but hard if you’re in a vehicle! They also tend to move fast and erratically, so your autofocus settings and shutter speed need to be right.
Finally, you have to be prepared to accept that your hit rate might not be very high. Getting four or five young animals to look in the same direction is almost impossible, and cubs obviously tend to close their eyes when they’re about to be pawed by their siblings!
Taking into account these difficulties, here are a few things to consider:
Door. I usually try and sit by the door in a safari truck. That’s because the seat is slightly lower than on the back row, and, if it’s safe, I might be able to open the door and lie my camera on the floor to get as low as possible.
Focal length. If you can’t get low enough in the vehicle, try going a bit further away and using a long lens. That will flatten the angle of view, giving the impression that you’re almost shooting at eye level.
Slopes. If you find animals on a slope, you can park downhill of them to get a lower perspective.
Autofocus. You should be using continuous autofocus (AF-C or AI Servo) to give your camera the best chance of focusing on the cubs as they play fight. If you have a mirrorless camera, you also need animal eye detection.
Shutter speed. Again, it’s best to use a high shutter speed for any kind of action shot, so try to dial in 1/1600 of a second (if you have enough light!).
#10 River Crossing

From Dust 'til Dawn
The Idea
When the Great Migration of blue wildebeests, zebras and other antelopes reaches the Mara river on the border of Kenya and Tanzania, photographers descend in their thousands. I went to the northern Serengeti last year, and I was lucky enough to see 10 river crossings in a week—but there were usually around 50 vehicles at each one!
If you can put up with that, your reward is the opportunity to photograph tens of thousands of animals as they gallop across a shallow river—with the constant risk of attack from crocodiles, lions and other predators.
I don’t usually get very excited about the blue wildebeest, but the sheer numbers and the uncertainty around when they might cross made it a memorable experience.
The blue wildebeest is a herd animal, so it can be VERY indecisive! Plains zebras are marginally better, but it usually took them at least an hour to progress from drinking at the water’s edge to actually crossing the river.
When the crossings took place, they lasted up to half an hour, and the line was 5-15 animals across. You can do the math, but that’s a big herd!
The Technique
I’ve always felt more comfortable taking pictures of individual animals rather than groups, so the challenge for me in Tanzania was to come up with a shot list that would capture the scale and excitement of the crossings. In a way, the herd mentality meant that the group was the individual, and the individual was the group.
Here are a few ideas I came up with:
Slow pan. If you want to express energy and movement as a photographer, there’s nothing better than the motion blur you get with the slow pan. It works particularly well if you have a sharp animal or landmark in the image to provide contrast. This might be a jeep or a stationary wildebeest or anything, really.
Fill the frame. One way of conveying the scale of a herd of animals is to fill the frame so that nothing else is included—giving the viewer the impression that the line of blue wildebeests goes on forever (see above). Just make sure that your aperture is narrow enough to keep all the animals acceptably sharp.
Dust, air and spume. Paul Goldstein sometimes says that the Holy Trinity of wildlife photography is ‘dust, air and spume’. Well, you get all three of those if you witness a Mara river crossing! Each one adds to the effect: the dust creates a sense of chaos, the ‘air’ (or animals jumping from high cliffs) provides a sense of danger and the spume creates bright highlights to set off against the dark coats of the animals.
Verdict
Well, there you have it! It might not be possible to find one place or one time of year to take all these classic safari shots, but they might guide your choice of destinations in future.
Having a shot list might seem like a bit of a bore, but it challenges you to exit your comfort zone as a photographer and demand more from yourself. If you want to improve and be able to show your friends and family genuinely great images that take their breath away, these ideas might be a good place to start.
If you’d like to order a framed print of one of my wildlife photographs, please visit the Prints page.
If you’d like to book a lesson or order an online photography course, please visit my Lessons and Courses pages.