
How to Photograph the Big Cats
“What shall we do now? Sleep…?”
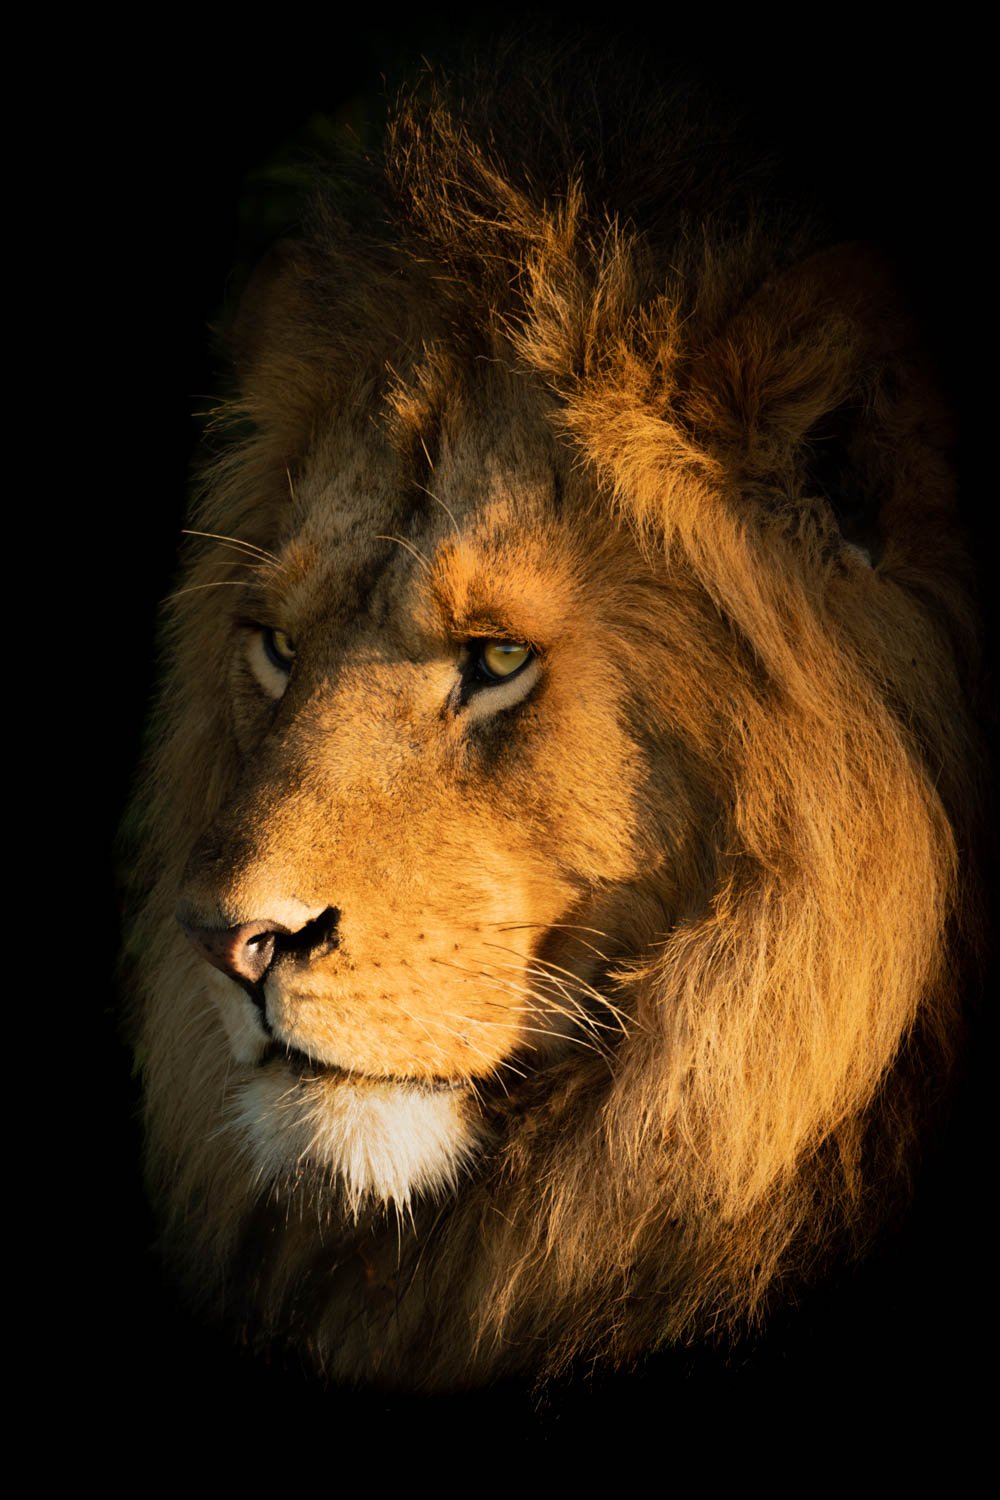
He-Lion
One of the most popular subjects in wildlife photography is the big cats—including the tiger, lion, jaguar, puma and cheetah. I’ve photographed all of them in the wild, and here are a few tips I picked up along the way…
Where?
Where are the best places to go to photograph the big cats? Well, here’s a quick guide to their general distribution:

“Tiger, tiger, burning bright…”
Tigers (Panthera tigris)
Bengal, Caspian, Indochinese, Malayan, Siberian and South China tigers (Panthera tigris tigris) can be seen from Turkey all across Asia to Siberia, but the best place to see them is in India. The most famous areas are Ranthambore National Park in Rajasthan and Bandhavgarh National Park in Madhya Pradesh, but I prefer Tadoba-Andhari Tiger Reserve in Maharashtra.
Bali, Javan and Sumatran tigers (Panthera tigris sondaica) can be found on various islands in Indonesia.

"Bundle!"
Lions (Panthera leo)
Lions (Panthera leo leo) are found in sub-Saharan Africa and Asiatic (or Persian) lions in Gir National Park and other parts of Gujarat in India. The main ‘traditional’ safari destinations to see lions are the Masai Mara in Kenya and the Serengeti National Park in Tanzania, but you can also see them in Zambia, Botswana, South Africa and a few other countries.
Southern lions (Panthera leo melanochaita) live in eastern and southern Africa, but they’re much rarer.

On the Prowl
Jaguars (Panthera onca) evolved in North America but their range now includes Mexico, Central America and South America. The best place to see them is in the Brazilian Pantanal, but you can also visit Kaa-Iya National Park and Jaguarland Reserve in Bolivia if you want to avoid the tourists!

Puma
Pumas (Puma concolor)
Cougars, mountain lions or catamounts (Puma concolor cougar) live in North and Central America. The best places to see them are national parks such as Banff, Cajas, Everglade, Jasper and Yosemite.
Pumas (Puma concolor concolor) live in South America, and the only place to photograph them is in Torres del Paine National Park or a nearby estancia (or ranch) in southern Chile.
Olympia
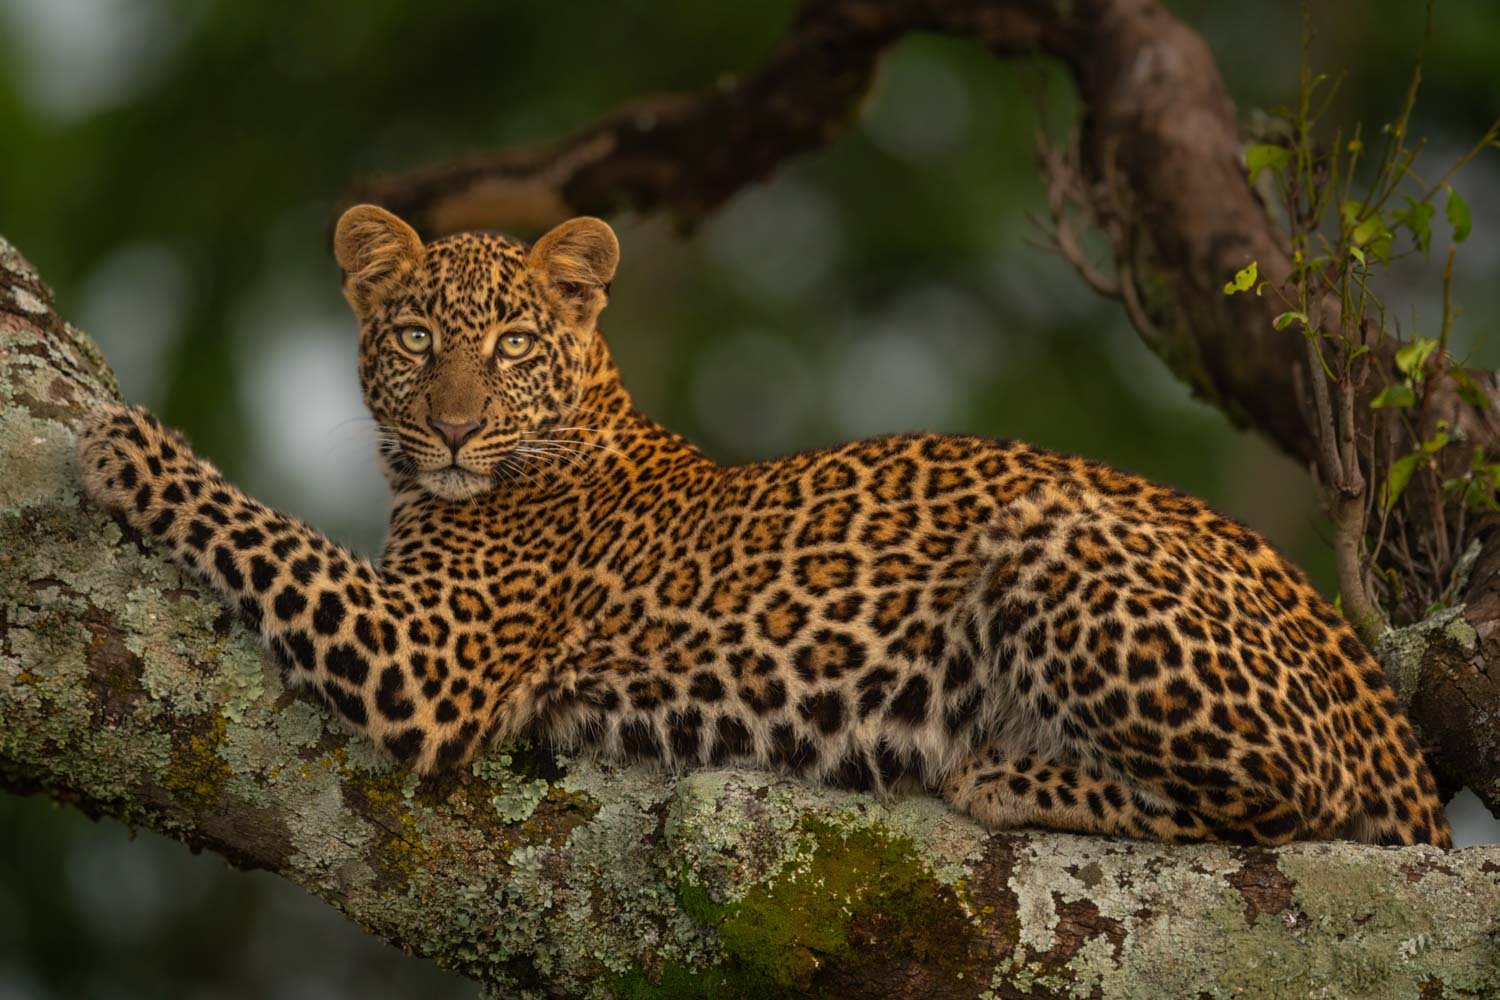
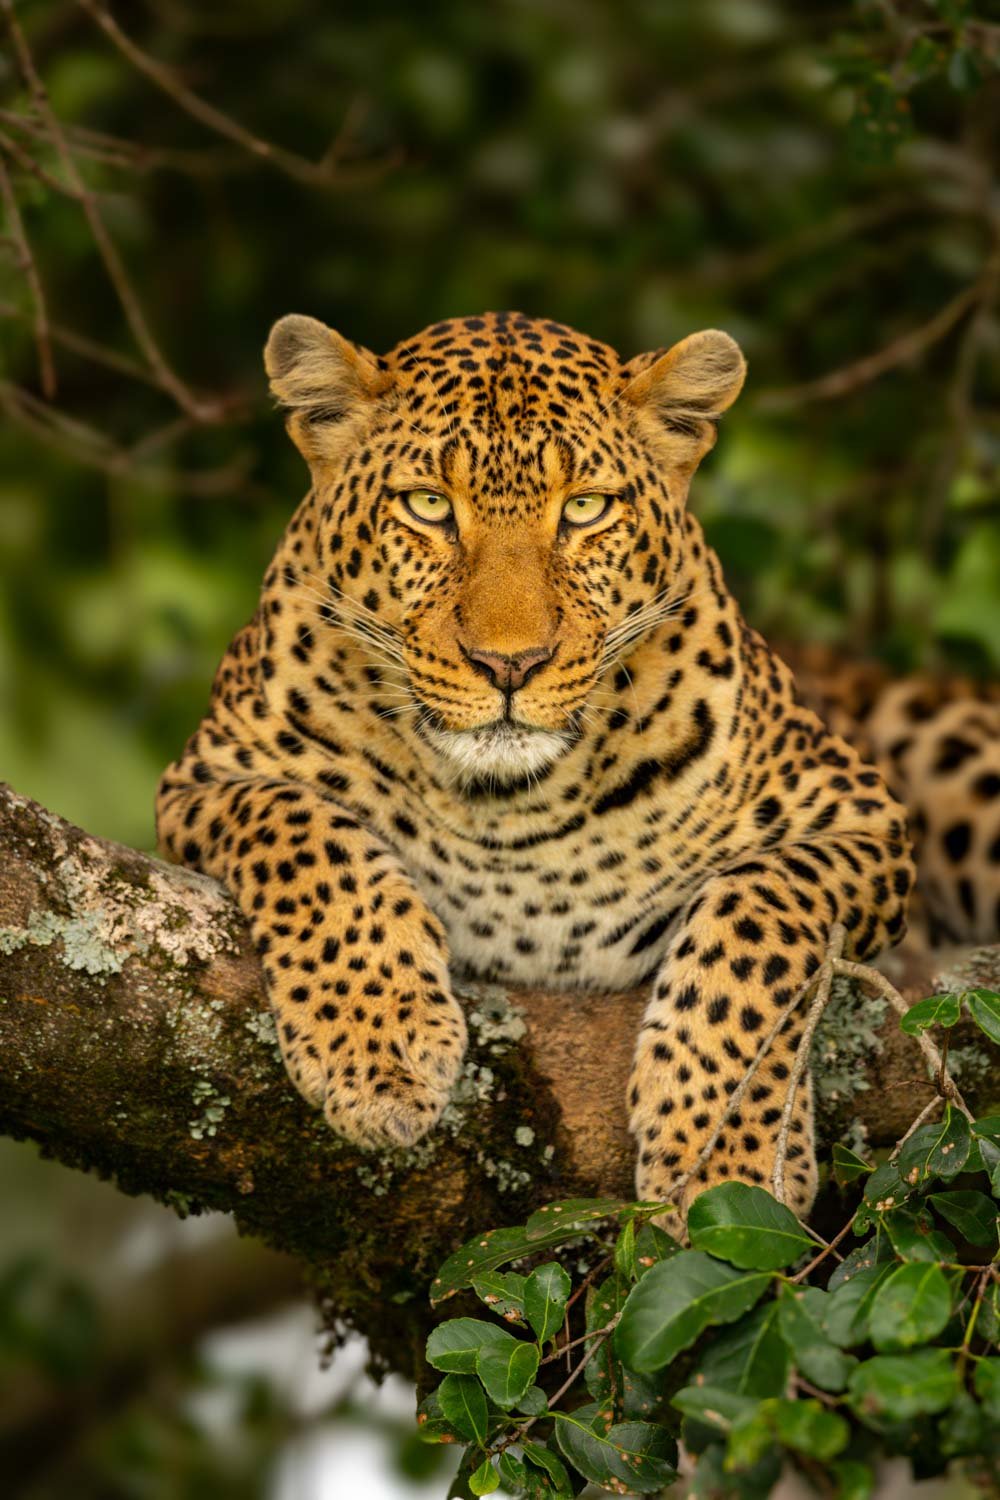
Leopards (Panthera pardus)
Indo-Chinese leopards (Panthera pardus delacouri) live in mainland Southeast Asia.
Indian leopards (Panthera pardus fusca) live in India, southeastern Pakistan and Nepal.
North China leopards (Panthera pardus japonensis) live in China.
Sri Lanka leopards (Panthera pardus kotiya) live in Sri Lanka, and the best place to see them there is in Yala National Park.
Java leopards (Panthera pardus melas) live in Java.
Amur leopards (Panthera pardus orientalis) can be found in the Russian Far East, Northern China and Korea.
African leopards (Panthera pardus pardus) live in Africa, and the best place to see leopards is in the traditional safari destinations.
Persian leopards or Iranian leopards (Panthera pardus saxicolor) are found in Southwest Asia.
Arabian leopards (Panthera pardus nimr) can be found in the Arabian Peninsula, and they may actually be Persian leopards.

"Behind you!"
Cheetahs (Acinonyx jubatus)
Southeast African cheetahs or East African cheetahs (Acinonyx jubatus jubatus) can be found in Angola, Botswana, Mozambique, Namibia, South Africa and Zambia, but the best places to photograph them are the plains of the Masai Mara in Kenya and the Serengeti in Tanzania.
Asiatic cheetahs (Acinonyx jubatus venaticus) can only be found in central Iran. That’s the only Asian cheetah population, and it’s tiny. In 2016, there were only 43!
Northeast African cheetahs (Acinonyx jubatus soemmeringii) can be seen in the northern Central African Republic, Chad, Ethiopia and South Sudan.
Northwest African cheetahs (Acinonyx jubatus hecki) is critically endangered and only live in Algeria, Benin, Burkina Faso, Mali and Niger.
When?
The best time to visit most of these places is in the dry season, but that varies by continent and even by country.
Tigers can best be seen from February to May or June. It gets pretty hot then, but the advantage is that the cats are drawn to the waterholes to drink and cool down.
Lions, leopards and cheetahs can best be seen in eastern Africa during the dry season between the ‘long rains’ from March to May and the ‘short rains’ from October to December. If you go to Sri Lanka, the best time of year is from March to October.
Jaguars can best be viewed in the middle of the dry season in South America, which is from July to October.
Pumas can best be viewed in Torres del Paine in the southern hemisphere spring or autumn—unless you want a snowy background, in which case you’ll need to go in winter.
Another aspect to consider is the time of day. Whichever cat you’re hoping to photograph, you’ll get the best chance in the early morning and late afternoon. They’re more active than during the middle of the day when it gets much hotter.
Lions generally hunt at night, which is very inconvenient as it’s almost impossible to photograph them then!
Finally, you should look out for certain activities. Lions and other cats spend a large part of their day sleeping, but there’s no point photographing a sleeping lion! You need to wait for them to wake up and ‘activate’.
Most people prefer action shots to portraits, so there are a few things you should look out for:
hunting (obvs!)
mating
feeding or nursing
climbing trees
drinking
swimming
play fighting
yawning
flehmen response (when the male lion opens his mouth to sniff out a female in heat using a gland in the roof of his mouth).
Most people on safari drive around until they see something interesting, then take a couple of pictures and move on—rinse and repeat. However, if you’re committed to photographing the cats, you need to stick with them throughout the day. If you invest the time (however boring it might get!), you’ll get your reward when they eventually become active.
I learned that lesson from Paul Goldstein…
How?
If you get a good sighting of a big cat, there are a few things to bear in mind:
types of shot
tules of composition
settings.
Types of Shot
Most people don’t come up with a shot list before they go on a trip, but it can be useful to visualise what you want beforehand. That way, you can make sure you take all the right equipment with you, and you can look out for opportunities to tick things off your list.
There are many different ways of photographing cats (including video). Here are a few to consider:
Dawn Yoga
Backlit shots can be tricky, and smartphones tend to create ‘ghost’ images when shooting into the sun. However, they do allow you to show rim lighting around your subject, and you can also create silhouettes.

Half Light
Sidelit subjects benefit from the most dramatic form of lighting as you get the greatest contrast between shadows and highlights.
Bath Time
Black backgrounds are always popular in wildlife photography, and it’s even easier to create them in post with Lightroom’s latest masking tools. However, to stop your photos from looking fake, it’s better to shoot your subject in sunlight with shadows behind.
68mph
Slow pan. Paul Goldstein taught this to me in Svalbard a few years ago. It’s a great way of conveying energy and movement, and it’s one of my favourite techniques.
You can read all about it in this guide, but the basic idea is to use a shutter speed that’s fast enough to keep the head sharp but slow enough to blur the background and the legs or wings of your subject. It’s tricky to master, but it’s well worth the effort.
You can also try the Dutch angle. This just means tilting the camera slightly. The word ‘Dutch’ here is a corruption of the word ‘Deutsch’, and the technique gets its name from its popularity with German filmmakers in the silent era.
Take Me Home
Sunrise and sunset. The golden hour just after sunrise or before sunset is one of the best times to take photographs as the light is warm and soft enough to avoid harsh shadows. The blue hour comes just before sunrise or after sunset and offers cool light that generates a quite different mood.
Stealth
Black and white images emphasise shapes, patterns and textures, and they can have a much more ‘arty’ feel than colour ones. If the light is flat, black and white is a good option as you can play with the tones in post to make them more dramatic.
"Give me a lion - on the rocks"
Sepia images have a retro feel to them that may suit your subject if you want to convey some of the magic of the old, colonial days—especially if you’re in Africa. It’s a matter of personal taste, of course, but Muchenje Safari Lodge in Botswana has recently printed dozens of my sepia images to put on their walls, so I’m looking forward to seeing them in person!

Low Profile
Silhouettes are a great way to make a dramatic composition, especially at sunrise or sunset. When I’m on a morning game drive, I love to find a treeless plain sloping up towards the rising sun in the east and take pictures of any animals that come along.
The brightness of the sky means you don’t need to worry about the exposure too much, but you might want to dial in a narrow aperture like f/16 if you want both the subject and the sky to be in focus.
Golden Goodbye
Low-key images are deliberately underexposed in order to add to the drama or mystery. This can work particularly well with a backlit or rim-lit subject.
High-key images are the opposite. I don’t go in for high key as much as low key, but it can be useful if it’s an overcast day and the sky can be turned into pure white.

"Is this close enough...?"
Close-ups are great if you can get near enough to the cat with a long enough lens. The face is always a good starting point, but you can also isolate other parts of the body, such as the tail of a leopard dangling down in a tree.
Rock, Tree, Leopard
Environmental portraits are intended to show wildlife in context. That means the subject is generally much smaller in the frame in order to leave room for the surroundings.
Look-throughs are a way of creating mystery by showing only part of an animal through the leaves of a tree or bush. If the situation isn’t suitable, you can always break off a leafy branch and hold it in front of your lens…!
Look-overs are similar to look-throughs, but they rely on shooting just over a foreground obstruction. This might be a grassy bank or maybe a pile of snow. The idea is to turn it into a blurry mass so that it seems as if the animal is appearing out of nowhere!
Rules of Composition
Many people come up to me and ask me what I think of one of their photographs, but I always tell them I’m not an expert in taste! Just because I’m a professional photographer doesn’t mean my opinion is any more ‘valid’ than theirs is.
However, I might be able to tell them why a photograph works (or not), and that’s because I’m familiar with a few of the rules of composition. For example, we both might like a shot, but I’ll be able to say it’s down to the use of leading lines or the rule of thirds.
These rules apply to all art, not just photography, and they’ve been around for centuries, so it’s worth getting to know them. Here are a few of the most common ones:
Mother’s Pride
The rule of thirds tells you to draw imaginary lines to divide the frame into three sections (both horizontally and vertically). You can then put the main focal point either on one of the lines or crossing points.
For some reason, most people don’t like the subject to be placed bang in the middle, and this is just one way of avoiding that. Most cameras even have the option to superimpose the rule of thirds grid on your viewfinder to make life easier when composing your shots.
Downward Cat
‘The decisive moment’ is a phrase used by photographer Henri Cartier-Bresson to describe the crucial point in time when the action is at its zenith or the composition is most pleasing. Nowadays, with mirrorless cameras churning out 30 frames a second, it’s easier than ever to pick the right frame!
Cub Scouts
Framing refers to finding natural objects such as the branch of a tree or a couple of bushes to act as a ‘frame’ to draw attention to your subject.
Negative space is a way of balancing your images by having the subject on one side and nothing on the other (except the background). Strangely enough, space actually has ‘visual weight’, so it can leave your composition looking more even and harmonious.
Leading lines don’t occur very often in Nature, but you might see a line of trees or just a dirt track that you can use to draw attention to your subject.
Symmetry is a key attribute of beauty, so you should look out for it wherever you can find it. That’s either going to be in the face of your subject or in its reflection in the water. To emphasise the symmetrical aspect of the composition, you can centre your subject and put the line of symmetry (such as the surface of the water) across the middle of the frame.
Point of view relates to one of the most common tips given to wildlife photographers, which is to shoot at eye level. That often means getting down on the ground—and I often tell my students that dirty knees are a good sign for a photographer!
However, the benefit is that your shots will be taken from the point of view of a member of the same species—not just a human observer standing nearby. The aim is to enter the world of the cats. You can also make them appear larger or smaller by shooting from below or above eye level.
"Are we nearly there yet...?"
Separation means making sure key elements of your photos don’t overlap each other. It just looks bad. That’s all I can say!

"No means no!"
Motion blur. Most people choose to freeze the action with a high shutter speed, but that’s not always the best option. If you choose a slower speed, you can allow creative motion blur to show the movement of parts of the animal or bird.
"You lookin' at me...?"
Depth of field is the zone where everything is ‘acceptably sharp’ in an image. If you want to separate your subject from the background to make it stand out, it’s a good idea to have a shallow depth of field.
You can do this by getting closer to your subject and/or using a wider aperture or longer focal length. On the other hand, if you want to create an environmental portrait, you might want a greater depth of field so that you can see the animal or bird in its environment.Odd numbers work better than even ones, for some reason. That means three, five or seven subjects work better than two, four or six. Strange but true…!
Alley Cat
Filling the frame means making sure your subject is big enough to see exactly what it is. If your subject only takes up a tiny portion of the image, you won’t be able to see any detail or appreciate its power, beauty or cuteness.
"How 'Bout Them Cubs?"
Aspect ratios show the relationship between the height and width of a photo. There are several common ones, but the default aspect ratio of a compact camera is 4:3 and a mirrorless camera or DSLR 3:2. I also create panoramas with a 3:1 aspect ratio. If you like posting pictures on Instagram, they’re best shown square in a 1:1 ratio.
These ratios work in both landscape (horizontal) and portrait (vertical) formats, and you can use any ratio you like. The main point here is that the aspect ratio should be controlled by your subject. For example, if there are lots of vertical lines formed by trees, shoot in portrait.
Cameras are designed to shoot in landscape format by default, but it’s a good idea to take at least a third of your shots in portrait. It adds variety and means you have more chance of getting a cover photo…!Foreground interest gives a photo depth. It’s something practised by landscape photographers, but it also comes in handy if you’re shooting wildlife. If you have foreground and background ‘layers’ as well as your subject, you give your photographs added complexity and appeal.
Balance is important in composition. One way of achieving this is to show two animals or groups of animals, one on either side. It just adds a sense of harmony and aesthetic appeal.
"Chase me, chase me...!"
Juxtaposition is just the placing together of elements that don’t obviously belong. In wildlife photography, that probably means something natural and something man-made. You can emphasise the contrast between the two through different lighting, tones and colours.
"It's always harder climbing down..."
Patterns and textures can make good subjects, and turning your photos into black and white can bring this out. Colour can distract the viewer from the basic shapes in the image, so removing it can emphasise the roughness of an elephant’s skin, for instance.
Cheetahs Never Win
Simplicity is also a good way of achieving a dramatic image without any distractions. Again, it works well in black and white, but you can also achieve a similar effect in colour by restricting your colour palette.
Lions Rampant
Clean backgrounds avoid distractions and help your subject to stand out. You can clean up your background by reducing your depth of field or changing position so that any annoying branches or other objects are no longer in view.
Cuteness Personified
Humour and cuteness are good ways of making animals appealing. Animals are always doing funny things, and baby animals always look cute—and cute sells!
Settings
There are many ways of setting up your camera for wildlife photography, but I generally shoot in manual mode with auto ISO. That lets me control the most important settings of aperture and shutter speed directly without worrying about the overall exposure of the image.
I normally shoot wide open at a shutter speed of 1/1000 of a second for animals or 1/3200 for birds. That gives me a shallow depth of field to separate my subjects from the background and lets me freeze any action.
Presets
One of the reasons I switched from my old D850 to the Sony ⍺1 mirrorless camera is that there are three presets on the main exposure dial. These let me change all the settings for a shot in one go, which is vital if you’re trying to switch from a portrait, say, to a slow pan.
In the old days, I’d have to change my exposure mode, shutter speed and ISO, which just wasn’t possible in most cases. Animals change their behaviour very quickly, and you have to be ready to take any type of shot at a moment’s notice!
With my new Sony ⍺1 cameras, I’ve saved three presets on the main dial to cover the most common situations:
1: Animal portraits/action shots
Exposure mode: manual with auto ISO
Aperture: wide-open
Shutter speed: 1/1000
Subject detection: animal
White balance: daylight
2: Bird portraits/in flight
Exposure mode: manual with auto ISO
Aperture: wide-open
Shutter speed: 1/3200
Subject detection: bird
White balance: daylight
3: Slow pans
Exposure mode: shutter priority
Aperture: automatic
Shutter speed: 1/5 (which I can change depending on the subject’s speed)
Subject detection: animal (which I can change if necessary)
White balance: daylight
If you can save presets like this on your camera, it’s a real lifesaver. Your set-up will be much more flexible and responsive at the decisive moment, so you should end up with more and better portraits and action shots.
Custom Buttons
As well as presets, most DSLRs and mirrorless cameras let you customise various buttons and dials, both on the camera body and even on the lens. This again saves you time when it matters.
The ⍺1 has a wealth of custom options. You can see exactly how I set it up in this article, but the main buttons I use are the two next to the shutter button. I’ve set these up to toggle between animal and bird AF and between the zone and expanded spot focus areas.
These are the two main adjustments I need in the field, so it’s handy to press either button just once to switch to the other setting. Conveniently, you can deselect all the other options if they’re not relevant to your needs.
I also use the exposure compensation dial quite often in difficult lighting conditions or if I’m deliberately setting up for a low-key or high-key shot.
Finally, I’ve always set up my cameras to use back button focus (or BBF). This just means pressing the AF-ON button on the rear of the camera body to focus rather than half-pressing the shutter button. It isn’t strictly necessary on mirrorless cameras as the focus area covers the whole frame, so you never have to ‘focus and recompose’ as you would with a DSLR. However, half-pressing the shutter is a bit finicky and isn’t guaranteed to work when shooting a burst of frames with a moving subject. In addition, it’s just what I’m used to…
Other
There are also a few other settings that you shouldn’t need to change very often. For each of them, you can simply ‘set it and forget it’:
File type: Raw files retain more data than compressed JPEG files, which means you can seamlessly change the white balance and recover more detail from highlights and shadows. Lossy compressed format maximises your frame rate while lossless compressed maximises image quality.
Autofocus mode: AF-C or Continuous focus lets you maintain focus on moving subjects (but it doesn’t hurt to use it for portraits either).
White balance should ideally be set to the current weather conditions, but if you don’t want the hassle of having to do that, I suggest keeping it on Daylight. Auto is not quite accurate enough for maximum colour fidelity as the camera has to guess what the lighting conditions are, but it’s even more convenient.
Lens switches on high-end telephoto lenses are important but often forgotten! You can read all about them in this
Frame rate should be set to the highest value, which is 30 fps in the case of the Sony ⍺1. This gives you the most chances of capturing the decisive moment.
Vibration Reduction (VR), Image Stabilisation or Optical Steady Shot should be switched on to avoid camera shake and give you the steadiest view through the viewfinder. Mode 1 is for normal use, Mode 2 is for panning shots and Mode 3 is usually for use on a moving platform, such as a boat.
Focus limiters let you tell the camera to assume your subject is within a certain distance range, such as FULL, 15m-4.5m or ♾️-15m on my Sony 600mm lens. This helps speed up focus acquisition and reduces the chances of ‘hunting’—when the AF system goes back and forth from close range to infinity without focusing on anything.
Zoom locks let you fix the focal length of the lens while you’re transporting it—usually at the widest angle so that the lens is at its shortest.
Function buttons on the barrel of the lens can be programmed to carry out certain tasks, such as resetting the focus distance.
AF/MF lets you choose between manual focus and autofocus.
DMF stands for Direct Manual Focus. When switched on, it means you can instantly switch to manual focus by turning the focus dial on the lens.
Zebra stripes in the electronic viewfinder of mirrorless cameras show you the areas likely to be overexposed. I set mine at around 109%.
Verdict
And that’s it! I hope you find these tips on where, when and how to photograph the big cats useful. They obviously apply to just about any animal, but I’m a big fan of predators, so I thought I should choose the cats for my sample images.
Who doesn’t love a big cat…?!
If you’d like to order a framed print of one of my wildlife photographs, please visit the Prints page.
If you’d like to book a lesson or order an online photography course, please visit my Lessons and Courses pages.