
20 Photography Mistakes to Avoid
There are lots of articles and books about how to take pictures, but there aren’t so many about how NOT to take pictures. In most cases, the problems only become problems when they happen accidentally, and it might be fine if your ‘mistakes’ are deliberate, such as overexposure in the case of a high-key portrait.
This is a list of the silly mistakes we all make—and should all try to avoid. I’ve illustrated them with some of my own worst photos, so you can take heart from the fact that even I can be a bit of a muppet sometimes…!
Accidents
Lens cap still on. Doh…!
Modern cameras are so complicated that it’s very easy to get something wrong completely by accident. In the old days, that was likely to be leaving the lens cap on, but there are so many buttons and switches on a digital camera that the possibilities are endless!
I used to have a Nikon D850, and there was no way to reset everything electronically, so I was often caught out when I accidentally turned off the Vibration Reduction switch on the lens or ended up in manual focus.
Mirrorless cameras are much more customisable, and it’s a joy to be able to confirm all my settings are correct by simply turning the main dial to custom setting 1, 2 or 3.
However, accidents do still happen. My camera stopped working recently on a trip to Africa, and I had no idea what was going on until I noticed that I’d accidentally knocked a switch on the battery grip halfway to the ‘lock’ position. I didn’t even know what was being ‘locked’, but it stopped me from using my camera for 24 hours…!
Noise
ISO too high…
‘Noise’ is to digital cameras what ‘grain’ was to film cameras: it’s just the blotchy appearance that makes photos look ugly when taken at high ISOs. There are two types of noise:
Colour (or chroma or chromatic) noise happens when individual pixels randomly change to a different colour.
Luminance noise happens when pixels get lighter or darker than they should be.
Unless you deliberately want a grainy appearance to your shots or you’re shooting in very dark conditions, ending up with noise is usually a mistake because there are simple ways to avoid it:
In camera. It’s always best to avoid problems when you take your shots. That way, there’s less post-processing to do, and you don’t get any loss of image quality. To reduce noise, you can either reduce the ISO manually or, if you’re using Auto ISO, you can widen the aperture or choose a slower shutter speed. There’s even an argument for ‘exposing to the right’, which means overexposing all your images by two-thirds of a stop, say, while making sure that you don’t clip the highlights. The extra light means background noise will be reduced. Another trick is to use multiple exposure if your camera supports that feature.
In post. There are lots of noise reduction programs out there these days, but my favourites are Topaz Labs DeNoise AI and Sharpen AI. They both have noise reduction sliders, and they’re both very easy to use. (As it happens, I’m an ambassador for Topaz Labs, so you can get 15% off any purchase by following this link and using the discount code nickdale15.) Another technique is to take several identical shots and combine them using focus stacking in Photoshop, but that’s not always possible (or easy!) if you’re not using a tripod in a controlled environment.
Blur
Shutter speed too slow…
Camera manufacturers have spent millions of pounds developing autofocus systems that will help you get the sharpest possible shots, so there’s no excuse in most cases for focus blur or motion blur (unless you’re doing something like a slow pan).
All you need to do is get yourself a decent camera and learn how to use it properly. Admittedly, the best cameras are expensive, and my pair of Sony Alpha 1s cost £6,000 each! However, even the humble iPhone has face detection now, so the problem is normally user error!
Cropped Body
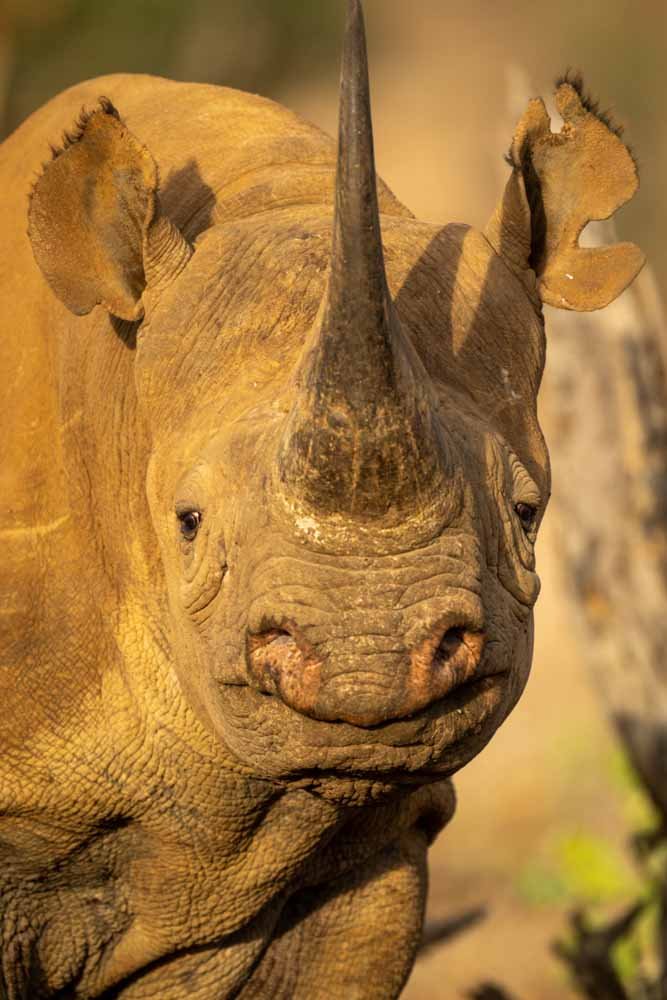
Didn’t check the edges of the frame…
Accidentally cropping out the tail or paw of an animal is easily done, but it’s also easily avoided just by checking the edges of the frame when you take the picture in the first place. After that, there’s nothing much you can do, so you just have to get into good habits. I took what I thought was the perfect portrait of a rhino at Ol Jogi in Kenya—only to find that I’d cropped off his horn! I was devastated…
Cropping in the Wrong Place
Cut off at the knees…
Another problem with cropping is that it can often look odd—to say the least!—if you crop the body of an animal in the wrong place. For some reason, it looks much better to crop between joints rather than at the joint. That means it’s fine to crop below the knee but not at the knee, for instance.
Wrong Exposure
Not enough exposure compensation…
Overexposing or underexposing your image can be done artistically to achieve a high- or low-key effect, but most of the time it’s just a mistake. Again, modern digital cameras make it very easy to achieve the correct exposure except in the most difficult light, but there are a few things to bear in mind:
Exposure compensation. Cameras are designed to assume that the world reflects 18% of the light that falls on it, so they’ll always try to hit that target even when you’re trying to photograph a polar bear on an ice floe or a black bear in the forest! Your camera obviously doesn’t know what’s in front of it, so you have to help it out by using exposure compensation. Just dial in one or two stops of positive exposure compensation to brighten the scene (for the polar bear) or negative compensation to darken the scene (for the black bear).
Metering mode. This tells the camera how much of the frame to use when working out the correct exposure. If you use the wrong one, then you might end up over- or underexposing your images. Different cameras have different options, but these are the most common:
Matrix metering is the default and uses the whole frame
Centre-weighted metering treats whatever’s in the middle of the frame as more important.
Highlight-weighted metering treats the brightest areas as more important in order to avoid washing out all detail from the highlights.
Spot metering samples a very small area of the frame (eg 2%) so that you can get the correct exposure in ‘contrasty’ conditions when there are very bright and very dark areas. You just need to point your camera at somewhere that’s roughly 18% in tone, like someone’s skin or a patch of grass.
Clipping Highlights and Shadows
Overexposed for the white bird…
A good photograph must generally show detail throughout. If it’s too bright, you might end up with patches of pure white. This is called ‘clipping the highlights’. If it’s too dark, the opposite might happen, and you might ‘clip the shadows’. Having some small patches of pure black in an image is not such a bad thing, though, so clipping the shadows is generally seen as the lesser to the two evils.
The easiest way to check your exposure is to look through the viewfinder—obvs!—but the human eye can see brighter whites and darker shadows than any camera, so what might be visible to you through an optical viewfinder might not turn out so well when you look at the final image or try to print it out!
Electronic viewfinders and LCD screens are better because they’re supposed to be WYSIWYG, which means What You See Is What You Get. However, what you see also depends on the brightness of the EVF and viewfinder.
Some mirrorless cameras show ‘blinkies’ or ‘zebra stripes’ or across overexposed areas, but for most people the best way of checking for clipping is to use the histogram.
Most cameras show it as one of the view options, and it’s just a frequency plot of all the pixels, showing the number of black ones on the left, the number of white ones on the right and everything else in the middle. All you need to do is take a test shot or two and check that there’s a gap between the brightest and darkest columns and the edge of the chart.
You can also do this in post using a program such as Lightroom, but, as always, it’s better to get it right in camera.
Butt Shots
This would’ve been soooooo much better from the other direction…
For understandable reasons, people generally prefer a face shot to a butt shot! There may be a good artistic reason for choosing to photograph the back of an animal, but it would have to be a pretty good reason, and that doesn’t happen very often.
More generally, it’s better to photograph animals and birds when they’re in profile or turned towards you. That means there’s no point carrying on shooting when they turn away. All you’ll get is a series of images that’ll end up in the bin!
That obviously makes your life more difficult because animals are not generally in the habit of running towards danger, and that’s what humans often represent. However, those opportunities do come along if you’re patient enough. You just need to make sure you’re prepared for them when they do.
Overlap
I should’ve moved to the left…
There’s something about the human brain that makes us dislike overlapping subjects. I don’t know why, but it’s important to bear that in mind both when you’re taking pictures and when you’re editing them afterwards. Try to look for separation. That means making sure your subject occupies its own space, without any overlapping branches or legs or anything else for that matter.
Body Position

I wanted the legs splayed out more…
Whatever the species, animals and birds often look ‘best’ in certain positions. Again, this is just one of those human preferences that doesn’t necessarily have any basis in logic, but it still matters.
Birds in flight, for example, tend to look better when their wings are all the way up or all the way down. Mammals walking across the frame also look better when they step forward with their far forelegs because it means their chests are turned towards the camera and therefore more visible.
Looking the Wrong Way
Should’ve waited until the topi turned its head to the right…
Photographers are taught to show their subjects ‘looking into the frame’ or to give them ‘room to move into’. Again, that’s because you want the eye to linger on the subject rather than be chased out of the image!
Whether the animal is moving or not, there’s just something jarring about seeing it looking the ‘wrong’ way. No matter how great the shot, it’s always worth waiting a few extra seconds for the animal to turn round…
Busy Background
Blue sky would’ve been better than branches…
As wildlife photographer Mark Carwardine once said, there are only three elements to a photograph: the subject, the light and the background. Of those three, the background might seem the least important, but it’s really not.
The human eye is drawn to things that are big, bright, sharp, contrasty and colourful. If your background has anything like that in it, it will distract the viewer’s eye and draw attention away from your subject.
Typically, you want a background that is ‘neutral’ in order to show off your subject. A ‘busy’ background with lots of branches or other details will do the opposite and should therefore be avoided. Remember, this is always under your control: all you have to do normally is move a few yards to the right or left, and you should be able to solve the problem.
Cramping the Subject
Should’ve asked the driver to move further away…
It’s sometimes important to ‘fill the frame’, but you also need to give your subject room to breathe. If the animal is too close to the edge of the photo, it will look trapped. This can be tricky to fix if you’re shooting with a prime lens and can’t zoom out, but you can always walk or drive a bit further away—you’re not nailed down!
Lines Behind the Subject
Shouldn’t have taken a shot with the branch passing behind the right-hand African fish eagle…
Humans have a strong pattern-seeking instinct, so when we see a line, we’re drawn to it and want to follow it—at least with our eyes! If you take a picture of an animal in front of a branch, a pipe or even the horizon, our eyes want to follow the line of the object in the background rather than sticking with the subject.
The object can sometimes even seem to be part of the subject, such as when you take someone’s picture and a telegraph pole behind him seems to be growing out of his head!
Shadows
The eye is not clearly visible…
Lighting is one of the most important elements of any photograph, and shadows play an important part in that. There are two basic forms of lighting:
Hard lighting comes from a point source such as the sun, which is relatively small (because it’s so far away) and therefore causes harsh shadows.
Soft lighting comes from a diffused source such as you get on a cloudy day. The clouds hide the sun and become in effect one giant softbox, reducing any shadows or even eliminating them altogether.
Soft lighting doesn’t really generate shadows, so you don’t need to worry about them, but hard lighting does. Whether you’re taking pictures in sunshine or using a flash gun, you basically have three options:
Front-lighting is generally considered the most ‘flattering’. Because the sun (or other light source) is behind the camera, it eliminates any distracting shadows from the face and body of your subject.
Back-lighting can create a beautiful golden halo around your subject, but it’s often avoided for a couple of reasons:
Flare can wash out your images and cause little specks of colour to appear due to light bouncing around inside your lens.
Your subject may appear in silhouette because the light behind it is so strong, hiding any detail in the face.
Side-lighting is the most dramatic type of lighting, but it has to be used carefully. If you want to show the perfect symmetry of a bird, for instance, it’s no good if half of it is in deep shadow!
Wrong Aspect Ratio
It really needed to be square, but I hate square crops…!
The aspect ratio is simply the relationship between the length and width of an image. Most DSLRs and mirrorless cameras take pictures in the 3:2 ratio because the sensor is 36 x 24mm—which boils down to 3 x 2. It’s also true that almost every camera is designed to take pictures in landscape (or horizontal) format.
However, different aspect ratios suit different subjects, and you can easily change them, either in camera or in post. It would be almost impossible to take a close-up of a giraffe in landscape format—and it would look pretty odd if you did! All you need to do is turn the camera round, and some cameras these days have built-in controls for shooting in portrait, which makes life a bit easier.
Wildlife photographer Andy Skillen reckons you should take at least a third of your images in portrait format, but that’s just a general rule of thumb. The most important thing is to consider your subject. Are the lines generally up and down or left to right?
When it comes to post-production, you have an infinite number of possible aspect ratios because you can crop your images however you like. Panoramas are popular, and I personally like the 3:1 format. However, I hate square images for some reason, and it’s annoying that the people at Instagram and Squarespace seem to love them so much!
Over-processing
Over-sharpened (although that was the printer’s fault…)
I’m a great fan of technology, and I want to produce images that are as powerful and beautiful as possible. I know that some photographers like Paul Goldstein refuse to remove anything artificially from their images, and I respect that point of view, but I’m happy to clone out distracting details and play around with the other settings—within reason!
The problem comes when you go a bit too far. It’s easily done—especially when you’re working on a single image for a long time. You get further and further away from the original, but you don’t notice because each individual change is so slight. It’s like buying a puppy and ending up with a dog: how did that happen?!
At moments like those, you can either step away from your computer and go back later with a fresh perspective or ask a friend, colleague or family member to have a look. There’s nothing like a dose of uncomfortable honesty!
Lack of Contrast

Not enough contrast—although I blame the fog…!
RAW digital images are ‘flat’ by their very nature, and they need to be beefed up in post before they look their best. You can change the contrast (and other settings) very easily in programs like Lightroom, so there’s no excuse for ending up with dull and lifeless images.
Wrong Point of View
Looking down on the penguin…
One of the most common pieces of advice for wildlife photographers is to get down to eye level. By matching the animals’ point of view, you can appear to enter their world, and that change in perspective might even make your photographs look as if they’ve been taken by a leopard or a rhino!
The opposite, of course, is also true. If you take a picture of a penguin while you’re standing over it, then nobody is going to want to put that on the wall!
Wrong Subject
I chose the one with the missing leg…
This might be a little bit controversial, but it’s important not to take pictures of the wrong subject. In other words, try and find an example that does the species justice! Models are pretty for a reason, so it’s always good to find a pretty one. Alternatively, find one with some character—like the famous lion, Scarface.
In the case of birds, there’s often a big difference in the plumage of males and females and especially breeding and non-breeding males. There’s nothing wrong with taking a picture of a ‘little brown job’, but with a little research into the best times and places to visit, you can aim so much higher!
I went to the Galápagos Islands a few years ago, and I was happy with all the pictures of the marine iguanas I’d taken—until I found out that I could’ve visited Española to see the colourful ‘Christmas iguanas’! I could easily have found out about them beforehand, but I was a little bit lazy. I regret that to this day…
If you’d like to order a framed print of one of my wildlife photographs, please visit the Prints page.
If you’d like to book a lesson or order an online photography course, please visit my Lessons and Courses pages.