
How to Organise your Photos
“Now, where’s that photo I took of the lilac-breasted something-or-other…?”
Hard at work…
Have you ever been desperately trying to find a photo that you took? Have you had to scroll endlessly through your Photos feed on your smartphone? Have you ever had to give up because it was just too hard to find? I’m sure the answer for most photographers is “Yes”, “Yes” and “Yes”! Keeping track of your photos is hard for everyone, but here are a few tips that might help.
Metadata

Blue Bird
The key to finding and organising your images is the metadata, which is all the words and numbers in digital images that describe the content. The EXIF data is created automatically, but that’s not usually much help as it only covers things like the shutter speed, aperture and ISO value. If you want to find images of particular subjects or species, you’ll need to add the metadata yourself—and that generally means the IPTC fields.
As with most things in photography, there’s a trade-off here: the time and effort of adding metadata versus the inconvenience of not being able to find a particular photo. If you’re a halfway serious amateur or professional photographer, this should be a no-brainer.
If you want to show your pictures to friends, relatives or potential clients, you need to organise them properly so you can easily and quickly access your favourites. Whether you end up building a website or just copying them on to your phone, you’ll need to add basic information such as titles and keywords—and that takes time…!
Software

The Rock
The easiest way to create and edit your metadata is by using a program like Lightroom on your computer. I use Lightroom Classic to manage all my images, and it has lots of possible fields to choose from and several powerful filters and search tools. It comes bundled with Photoshop, which offers a vast array of features for editing and graphic design.
Lightroom and Photoshop cost around £10/$10 a month, but there are free options. the Apple iPhone is pretty good at finding photos if you search for a particular species by name. You can also rename your files in Finder (on a Mac) or File Explorer (on a PC)—although, annoyingly, the file name doesn’t get pulled through to Photos for some reason...
If you give your photos meaningful names using a few important terms, including the name of the species, you should be able to find most things. You could also use a free photo editing program, such as GIMP, Fotor, PhotoScape, Photo Pos Pro or Paint.NET.
However, Lightroom is probably the best interface, and there are even plugins you can download for extra functionality, such as the ability to search and replace text in various metadata fields. And it doesn’t hurt that I get free access from selling so many images through Adobe Stock!
Which metadata fields you decide to add is entirely up to you, but as soon as you decide to sell images through stock agencies, you’ll need to follow their rules. This generally means a title of no more than seven words (or 50 characters) and at least 10 keywords.
Titles
Different agencies have different systems and guidelines, so you’ll have to check each one before deciding on a global template. However, these are the ones I create for each image:
File name
Title
Caption
Headline
Copy Name
Keyword Tags
The file name, title, caption and headline must be the same for each photo you send to stock agencies as they import different fields. However, I find it useful to keep the Raw files on my hard drive permanently and only create temporary JPEG files when I do my weekly upload of 100 images to all my stock agencies. I also keep folders of my Top 100 (or five-star) photos in colour and black and white, plus a folder of all my four-star images.
Wet and Wild, one of my five-star images
The different versions of each image contain different basic information:
File name. The Raw file has the basic seven-word title for the stock agencies, eg Female cheetah races through puddles in savannah. However, I use my Headline to export to my Top 100 and 4* folders. This is supposed to be a snappy phrase designed to appeal to competition judges and potential print buyers, eg Wet and Wild.
Title. This is the basic seven-word title for colour images. However, I add the word ‘Mono’ to the start of the title of the black and white version, removing another word and changing the rest as necessary to keep to the seven-word limit, eg Mono female cheetah crosses puddles in savannah.
Caption. This is the basic seven-word title for three-star images, but I add a more detailed description of my four-star and five-star images, including the EXIF data, eg
A female cheetah races through standing water in the African savannah. Her feet are gathered under her, and she leaves a splash of water in her wake. Shot with a Sony ⍺1 and a 600mm lens in the Mara Naboisho Conservancy, Kenya, in January 2024.ISO 5000, 600mm, f/8, 1/1600, 0 EV
Headline. This is the snappy phrase I mentioned earlier, eg Wet and Wild.
Copy Name. I change this to Mono for all my black-and-white versions.
Adding different metadata to different versions of each image can get a bit confusing sometimes. However, it pays off in the long run once you start submitting to stock agencies, entering competitions, or selling prints. It just means you can ‘set it and forget it’, so all the possible information is there when you need it.
If you need to simplify or edit the data, you can do it in the exported JPEG version, not the original Raw file. For example, one of my agencies called Design Pics asks for all shots that don’t have a model release to have NA in the Headline field. Again, this is another chance to set up a preset.
Keywords
If you submit your images to stock agencies, you’ll also need to create keywords. These are words and/or phrases to help potential buyers find the right files to download, so they’re very important.
I only submit wildlife images these days, and I’ve set up dozens of Lightroom presets to save time. Once I’ve added the file name to all my photos, I can filter them by species, activity or setting. I can then select all the relevant files and add the right keywords in one go.
Adding the right keywords to your images to attract buyers can be tricky. You need the obvious ones, such as the name of the animal, but picture editors and other buyers are all individuals, so one might search for ‘cheetah’ while another looks for ‘cat running’ and another ‘Acinonyx jubatus’!
It pays to do a bit of online research to work out the best keywords, and I find Wikipedia is a good starting point. Plenty of animals and birds have different common names, so it pays to include them all. Wikipedia entries contain all the Latin and English versions of the names, plus any relevant collective terms, such as ‘predator’. Here’s my Cheetah preset:
cheetah
cat
mammal
animal
Acinonyx jubatus
predator
feline
felid
As well as my list of species presets, I’ve also created presets for the most common words I include in my titles. These usually show the surroundings and what the animal or bird is doing. Here’s my Action shot preset:
action
action shot
movement
exciting
excitement
excited
IPTC Image Fields
As well as the metadata specific to each image, there are also a few fields that describe the location of the shoot. These are usually the same for all your images if you’ve been staying in the same place, but you just have to be a bit careful if you’re moving from lodge to lodge or camp to camp.
Again, you can set up global presets for certain locations. I’ve been to Kicheche a few times, so I have presets for Kicheche Bush Camp, Mara Camp and Valley Camp. This is the one for Bush Camp:
Sublocation: Kicheche Bush Camp
City: Narok
State / Province: Masai Mara
Country / Region: Kenya
ISO Country Code: KEN
IPTC Creator Fields
As well as the metadata specific to each image, there are also lots of fields that relate to the photographer. Again, you can save yourself time by creating a preset with all the relevant information.
You can even set up some of the fields on your camera—depending on the model. These will automatically be imported with all your image files. I do that for the Copyright field: ‘Copyright 2024 Nick Dale, all rights reserved.’
In addition, I’ve set up an IPTC Creator preset in Lightroom that has all personal details. Funnily enough, they all come from the IPTC Creator section of the options list!
Creator: Nick Dale Photography
Creator Address: 99 Ormonde Court, Upper Richmond Road
Creator City: London
Creator State / Province: England
Creator Postal Code: SW15 6TR
Creator Country: United Kingdom
Creator Phone: +44 7942 800921
Creator E-Mail: nick@nickdalephotography.com
Creator Website: https://www.nickdalephotography.com
Creator Job Title: Photographer
Workflow
Golden Pelican
If you’re anything like me, you’ll take thousands of pictures every day on a photographic trip. Culling those images and adding all the required metadata can take a LONG time!
Some people can be put off by that, but you shouldn’t just throw your hands in the air and give up! There are ways to speed up the process—even if your camera does shoot at 30 fps like mine…
Most photographers these days have busy lives, so the time it takes to edit your images is valuable. It has an opportunity cost. However, you have to think about the benefits as well as the costs. As I say, if you’re serious about your craft, then you should be doing things properly. It’ll save time in the long run…
I’m very analytical, and I love using software tools and data to help optimise my life. You might be a completely different kind of person, but it might still be useful for you to see my workflow so that you can decide for yourself.
Take Pictures
This is obviously the first step. However, there’s no telling how what the volume might be. I spend a lot of time in Africa, and there are some game drives when I max out my memory cards by taking thousands of pictures and others when I fall asleep in the back seat and don’t take a single one!Import Pictures
Once I get back from a shoot, I copy and import all my images using Lightroom on my laptop. I have a card reader, which helps, but it doesn’t take more than a few minutes for each card. A useful tip to save time is to select Embedded & Sidecar and uncheck Build Smart Previews in the Import panel. That means you’ll use the JPEG thumbnails that are part of the original files, which saves time both when you’re importing them and when you’re scrolling through them later.Rate Pictures—First Pass
Many people find it very difficult to delete their images, and I totally understand that. Once they’re gone, they’re gone. That’s why I do things the other way round. I rate the images I like, and then I can batch-delete the unrated ones at the very end of the editing process. In Lightroom, you can easily rate images on a 1-5 scale by pressing the relevant number key. I use the following scale:
1*: Non-wildlife shots and videos, eg people, buildings and food. These are only good for social media!
2*: I don’t rate anything two stars at the beginning, but I might upgrade a one-star shot or downgrade a three-star shot later.
3*: Shots I think I can sell.
4*: Good shots that are above average but don’t quite make my all-time Top 100.5*: My all-time Top 100.
When I’m rating images, it speeds things up to use Grid view in Lightroom. That means you can see between four and 24 images per line. If you’re taking bursts at 20-30 fps, all the shots will be pretty similar, so you don’t need to inspect every single one. If you need to check for sharpness or detail, you can always press and hold the Z key. That’ll temporarily zoom in to whatever magnification you’ve selected in Loupe view (in the Navigator box at the top of the left-hand panel of the Library and Develop modules).
If I’m not sure about the rating, I might crop the image at this stage to see what it would look like, but I rarely do any actual editing—unless the exposure is really screwed up!
I always take my laptop on my trips, and I try to rate all my images after each game drive. Sometimes, I don’t have time, but I always feel bad about it, so I’ll often stay up very late or wake up very early to get through the backlog. As I always tell my friends, I don’t go on ‘holidays’. When I’m away, I often end up working 16 hours a day!Rate Pictures—Second Pass
When I go through my pictures the first time round, I never know what might be coming up. I might give an image four stars and then see an even better version a couple of frames later. That’s one of the reasons why it’s important to check your ratings: by downgrading the first version to two stars, say, you’re deduping your collection. Another reason is that you never really know what the overall quality level is going to be. You might start rating everything in sight initially and then realise that you have so many good images that you can cull most of them during the second pass.Edit Four- and Five-star Pictures
At this point, I’ll usually want to start showing people my best work—either on the trip or when I get home. That means I’ll crop and edit my four- and five-star images and start posting them on social media. I post a Shot of the Week every Saturday on Instagram, Facebook, LinkedIn and X, and it’s nice to have some new material!Add File Names, Titles, Captions and Headlines
Once I’ve arrived at my final selection, I can add file names to each image. This is the bit that’s probably the most time-consuming. Having decided on a seven-word format, I need to find unique names for every single picture of a cheetah sitting on a termite mound! Believe me, it gets hard after a while. I tend to start with the species name (using Wikipedia as my guide), but I make an exception for close-ups and panoramas. In those cases, I’ll start with ‘Close-up of…’ and ‘Panorama of…’ respectively, eg Close-up of plains zebra with rising sun or Panorama of two white-faced whistling ducks swimming.
Once I’ve added all the file names, I can use the jb Search Replace Transfer plugin to copy them to the Title, Caption and Headline fields. Basic word processing tasks aren’t easy in Lightroom, so this bit of software is a godsend!Add Keywords
The good thing about adding the file names first is that I can then use my Lightroom presets to add the keywords. By adding spaces at the start of their names, I’ve sorted them into two groups: general followed by species. I can then work through both groups to add everything I need. There are so many species in my preset list that it’s sometimes quicker to sort my images by file name and then simply add the relevant preset for each group, eg elephant shots, then lion shots.Add Other Metadata
Apart from titles and keywords, the other main metadata to add are the IPTC Image and Creator fields and the GPS tags. The IPTC Image and Creator fields are easy to add globally using a preset, but the GPS tags might be tricky.
If your camera has a GPS module, then it’s no problem. The geolocation is added to every file, and you can happily look at the Map module in Lightroom (or elsewhere) to see where you’ve taken all your pictures.
However, my camera doesn’t automatically geotag the images I take, so I have to rely on Sony’s Imaging Edge software to do the job. This is very inconvenient and unreliable. I have two Sony ⍺1 camera bodies, but I can only pair one of them with my iPhone, so the other camera can’t add any GPS data. In addition, it’s very tricky to operate, and you need to take several test shots to make sure it’s working. Please, Sony, can you fix this soon…!Export Pictures
Once I’ve gone through all these steps, I export all my favourite images in JPEG format so that I can populate my 5* and 4* folders and submit my three- to five-star images to stock agencies. What format you choose is, of course, up to you, but I generally use the following custom settings:
Export Location
Folder: Downloads, Latest Images or 4*/5*/5M
File Naming
Rename to: Filename
File Settings
Image format: JPEG
Limit filesize to: 19,800 K (to fit the stock agency maximum file size)
Color Space: sRGB IEC61966-2.1
Image Sizing
Resize to fit: Long Edge 6,012 pixels (to fit the LinkedIn maximum file size)
Metadata
Include: All Metadata
✓ Write Keywords as Lightroom HierarchyUpload to Agencies
I submit all my images to Design Pics on an exclusive basis, so I give them first pick by sending low-res versions via FTP using FileZilla. They’re JPEG files using the sRGB colour space and measuring 1500 px on the long edge. Whatever they don’t want, I can submit to Adobe, Stock and various other microstock agencies.
Design Pics usually takes a few weeks to decide on its ‘selects’. Once I’ve uploaded the hi-res versions to their servers, I then switch to a weekly upload of 100 images to my other agencies. There are a few that let me do that via FTP using FileZilla (using my standard export settings shown above):
123RF
Adobe
Alamy
Depositphotos
Panthermedia
Shutterstock
After I’ve uploaded them, I then have to submit them using the agencies’ websites. For the other agencies, the whole process takes place on their websites:
500px
EyeEm
iStock
PIXTA
Alamy sends me an email when my pictures are ready to tag and submit. EyeEm does the same, but I have to do that for every single file on the EyeEm app! Very annoying…Delete Unrated and Two-star Pictures
Once I’ve done absolutely everything I can think of to edit my images and add every last piece of metadata, I can delete my unrated images. I can also delete the files I’ve downgraded to two stars. I just have to make sure that I don’t delete any nice Facebook shots of people I’ve upgraded to two stars, but that’s usually easy enough.Back up Pictures
Backing up is obviously very important, but I still haven’t come up with an ideal system. I used to use an online service called CrashPlan from Code42, but the problem was that I was so often in places that didn’t have a reliable Wi-Fi signal.
I then switched to using external hard drives, but the problem with that was the hand luggage weight limit of 15 kg on most internal flights in Africa. I do back up to a couple of external hard drives, but I don’t usually take them with me.
That’s obviously not ideal as I could lose everything if my laptop went wrong, but I don’t quite know what to do to square the circle…!
Spreadsheets

Watch the Birdies
One result of working in strategy consulting for 10 years is that I love a good list! And photography gave me the ideal opportunity to create a massive list of all my images. I now have nearly 50,000 photos and videos in my Lightroom catalogue, and, of those, the 30,000 that are on sale are all on that list.
I originally created the database so that I could keep track of which images I’d uploaded and submitted to stock agencies and which images had been downloaded but it gradually grew and grew. It now has 153 columns and 30,335 rows!
I won’t bore you by listing them all, and I don’t necessarily recommend creating such a monster! However, there are good reasons for all the fields, and I can’t think of a better way of recording all the information I need.
There are just so many occasions when I need to know what my best-selling images are, say, or which pictures I’ve already submitted to a particular contest. Without my spreadsheet, it would be impossible to keep track.
Here are the general groups:
basic information, eg rating, on sale and batch number flags, date, location, headline and title
sales and stock, eg downloads; microstock and Design Pics flags; print, card and wallpaper sales and cards and prints in stock
galleries, eg exhibitions and online galleries
competitions, eg competition entries
social media, eg Shot of the Week.
Memory Cards

Stealth
There are a few photographic accessories that have an important impact on how easy it is to organise your images. The first and most important one is the memory card. These days, the price of memory cards has fallen significantly, and it’s possible to get very fast, high-capacity cards for only a few hundred pounds (or dollars).
I realise that photography can be a money pit. As Everett M Dirksen almost said, “A hundred here, a hundred there, and pretty soon you're talking real money!” However, I think it’s a good idea to get the fastest cards you can afford with the highest capacity.
The reason is that it makes life so much easier. You don’t need to worry about having enough memory cards on a shoot. You don’t miss shots because your camera is struggling to write 20-30 fps to an SD card. And you don’t end up spending ages waiting for your photos to get copied across to your hard drive.
The capacity, the write speed and the read speed are all important, and I now have two Lexar 320GB Professional CFexpress Type A GOLD Series cards and a further four Sony 160GB TOUGH CFexpress Type A Flash Memory cards.
Laptop

The Pointer
When it comes to computer equipment, you get what you pay for. That means a decent laptop can easily cost a few thousand pounds (or dollars). That may not be affordable for some people—especially hobbyists or those who are just starting out.
However, the argument remains essentially the same. Good equipment makes your life easier, and a laptop with a fast processor, plenty of RAM and a high-capacity, solid-state hard drive can speed up your workflow enormously. It’s also portable, which is crucial if you want to edit your images on the go.
Photographers spend lots of time hunched over the computer. I certainly do! I reckon I spend an hour editing my images for every hour spent taking them. That means I get the benefit for at least half my working life. And that doesn’t even include all the time I spend working on other tasks, including posting to social media, negotiating with safari lodges and checking emails.
External Hard Drives

Horn of Africa
External hard drives are a great way to back up your images. They’re light, they’re fast and they’re becoming cheaper and cheaper. If you go on photographic trips where there’s limited Wi-Fi, they’re a great way of ensuring your precious images are safe.
I have 4 TB and 5 TB external hard drives, and I back up all my Raw files to them after each trip I go on. They’re fast and solid, and they’ve never let me down. The only problem, as I say, is that I struggle to fit them into my camera bag when I’m going to Africa!
Smartphone

He-Lion
When I was working, I always used a PC because that’s what my clients used. It was only when I retired that I could switch to a Mac. I now have an Apple M1 MacBook Pro with an 8 TB hard drive and 64 GB of memory and an Apple iPhone 15 Pro Max, and I synchronise my Top 100 photos on both.
This is a great way to make sure my images are readily available whenever anyone expresses an interest. It might be a potential client or it might just be a friend down the pub—either way, I’m covered!
Verdict
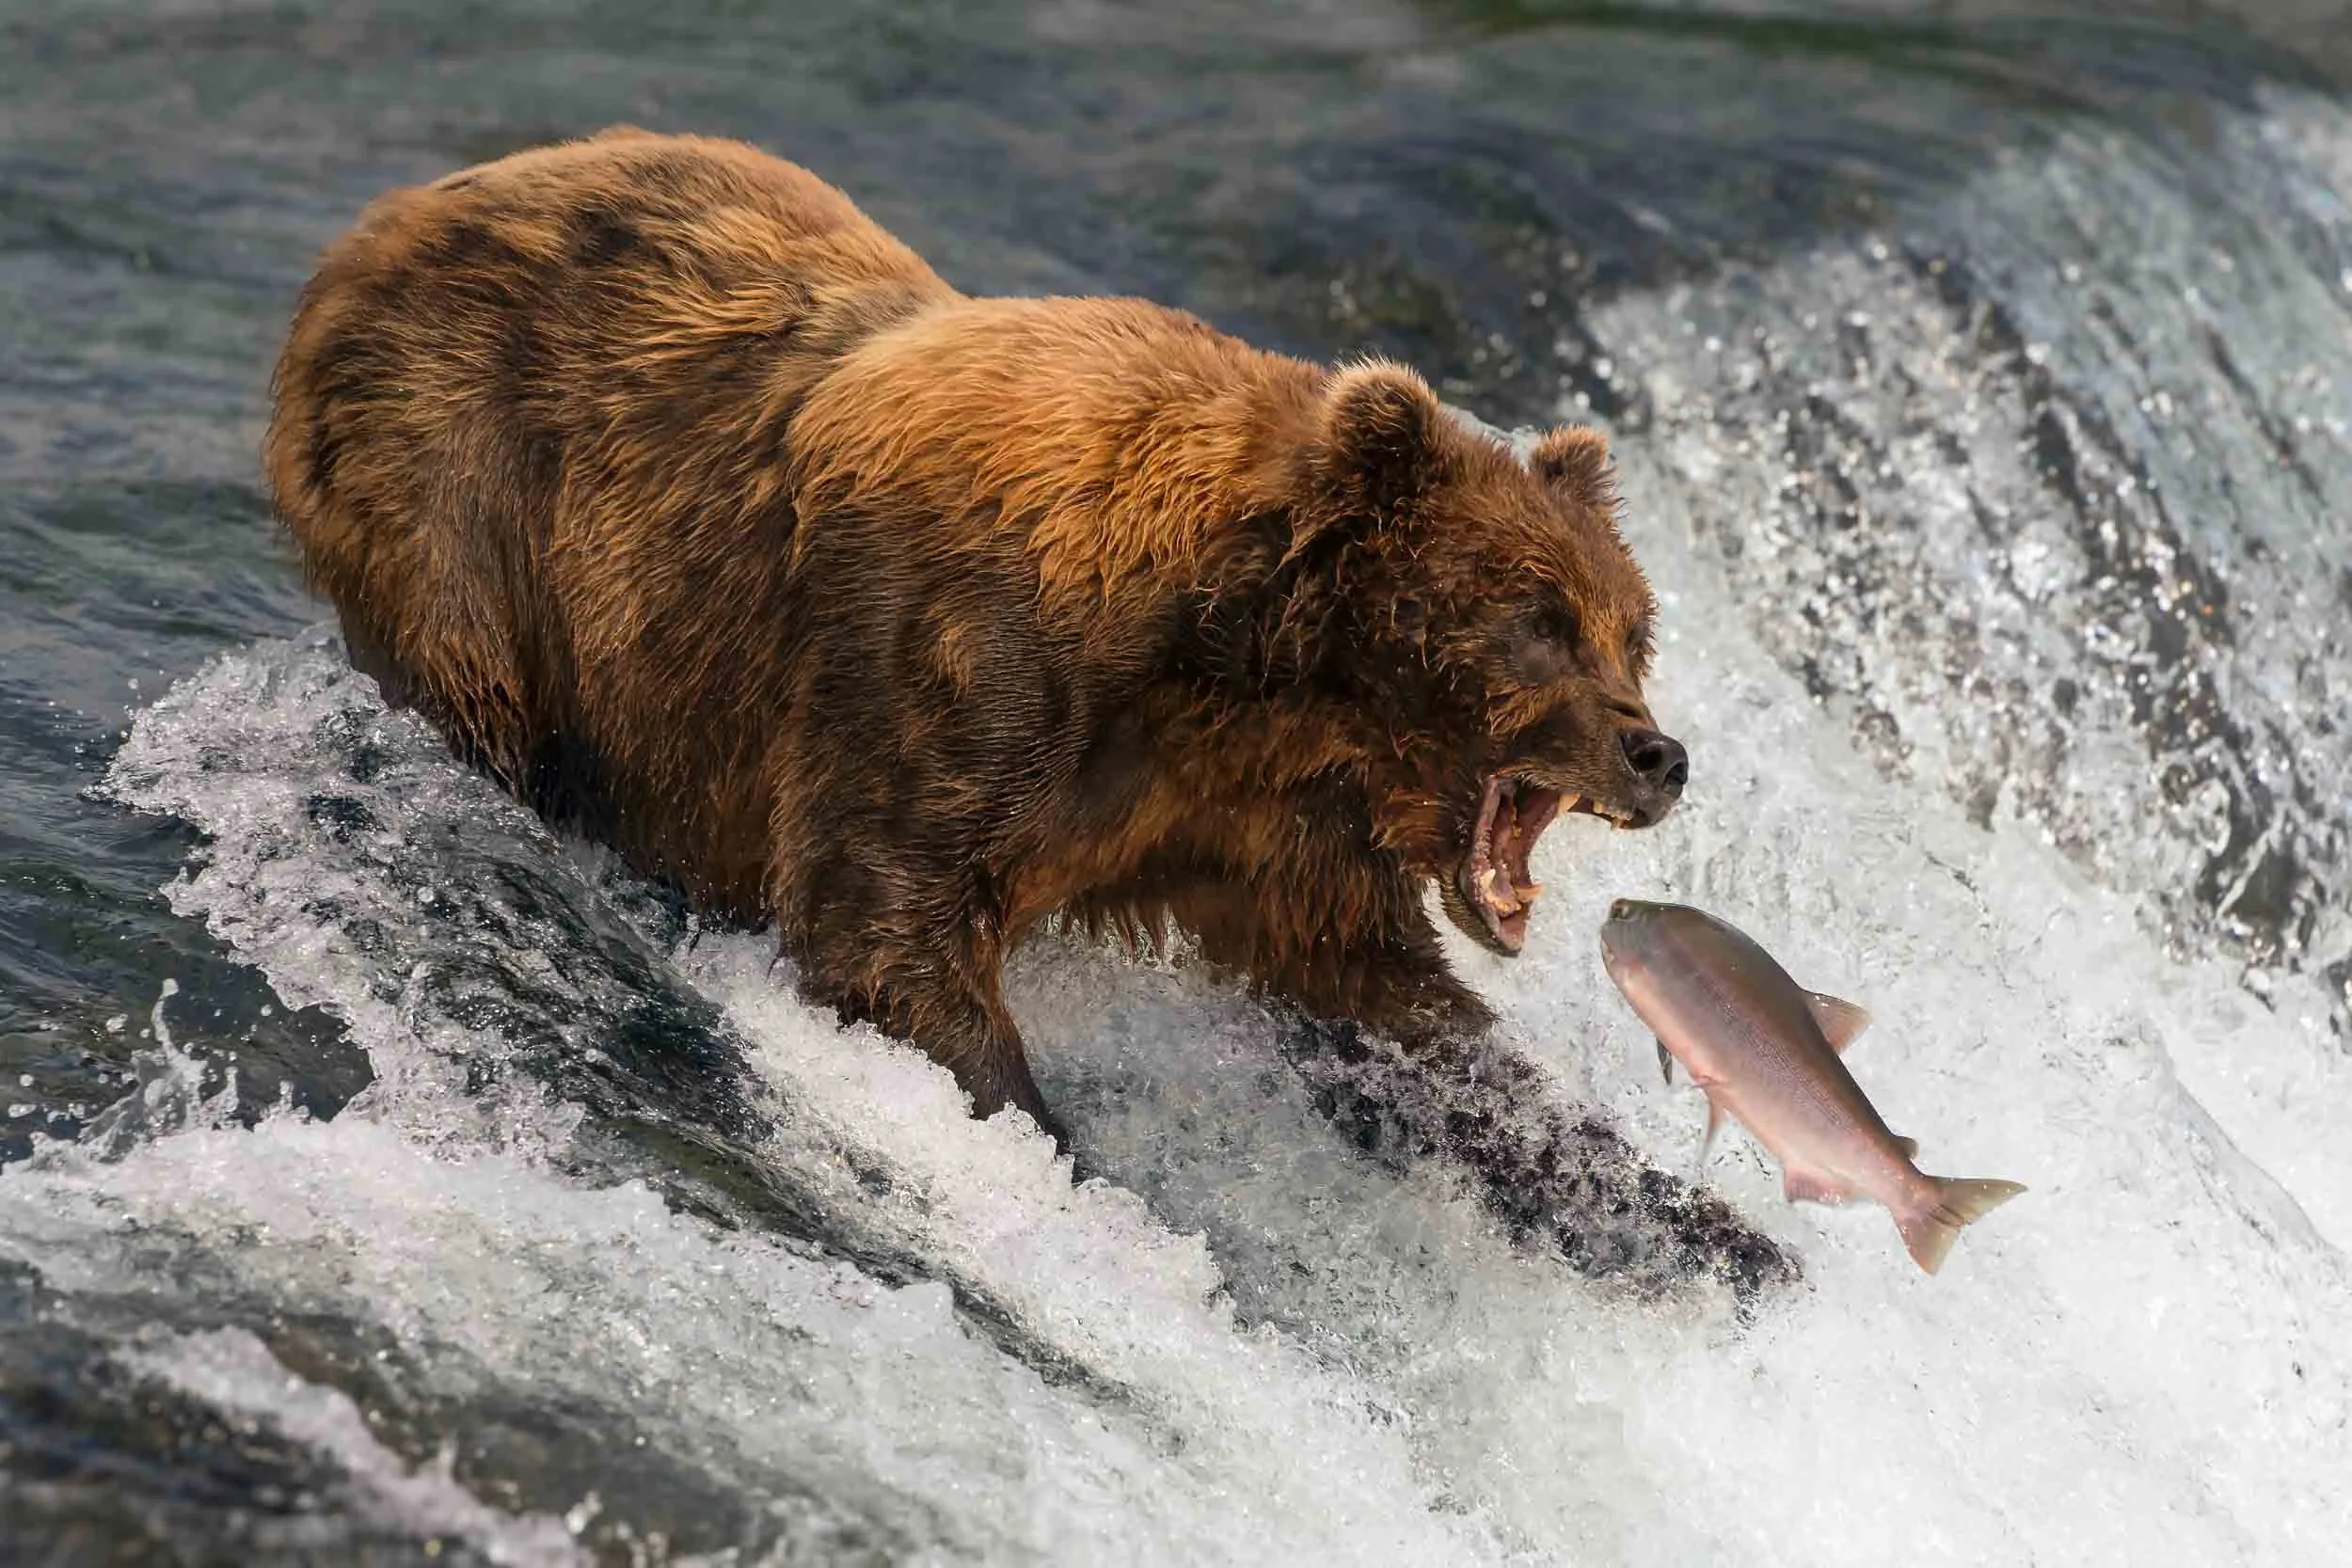
Bear Gills
Photography is a complicated and expensive hobby, but I hope I’ve shown a few ways in which you can organise your affairs so that your photos are safe and organised enough that you can access them easily at any moment.
Yes, it might cost you a few bucks, but if you’re serious about your work, you’ll make the necessary investment in time and kit to make your life as a photographer as easy as possible.
There are plenty of things you should be worrying about in this business, but that shouldn’t include the tools of the trade and your workflow.
If you’d like to order a framed print of one of my wildlife photographs, please visit the Prints page.
If you’d like to book a lesson or order an online photography course, please visit my Lessons and Courses pages.